Manual: Food production
A step-by-step training manual for kitchen and back-office staff - dishes, recipes, kitchen custody, production issue and settlement, and the daily ledger.
This manual is for anyone who runs the kitchen side of a Food workspace: building the menu, costing recipes from real stock, moving raw materials into a kitchen's custody, turning that stock into finished dishes, and closing out the day's figures. For the till itself (taking orders, payment), see Manual: Retail till & billing - the same till engine is shared across verticals.
Most of what's here is AGENT work or above (kitchen staff, chefs, managers) - a few master-config screens are ADMIN/OWNER-only, called out as they come up.
Getting started: Food settings and your floor
Two one-time setup screens before you sell anything: your tax/legal details, and your dining floor (if you take dine-in orders at all - a pure takeaway/delivery kitchen can skip the floor entirely).
Food settings
Open these from Settings → Food & kitchen → Food settings (admin only).
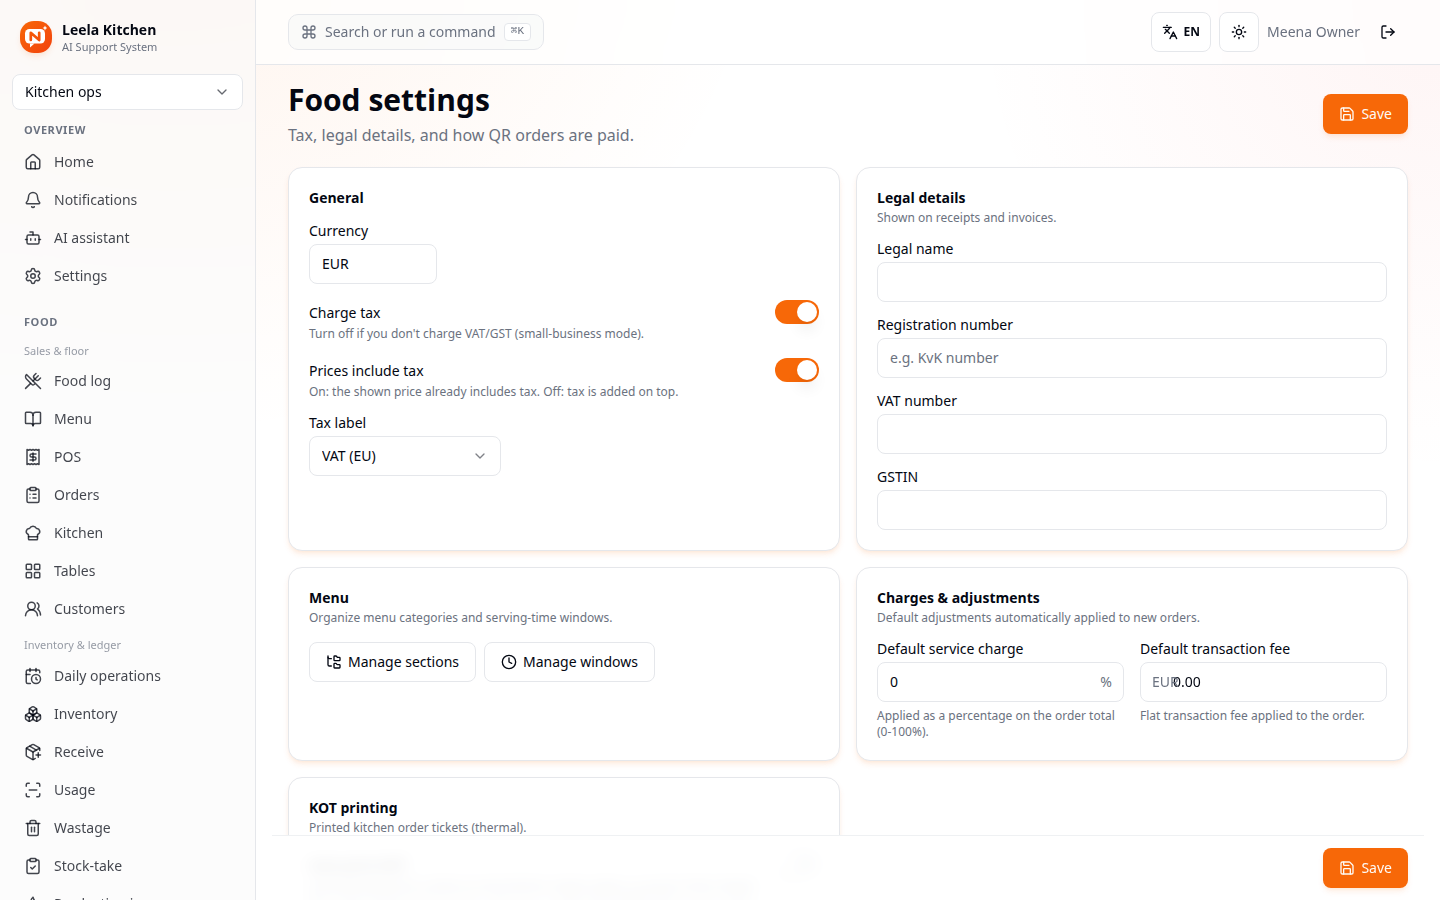
Set your currency, whether you charge tax at all (turn it off for small-business/no-VAT mode), whether shown prices already include tax, and a tax label (VAT for Europe, GST for India). Legal details (name, registration number, VAT/GSTIN) print on receipts and invoices. Charges & adjustments lets you set a default service charge % or flat transaction fee applied to every new order - useful for a restaurant that always adds a service charge, skippable otherwise.
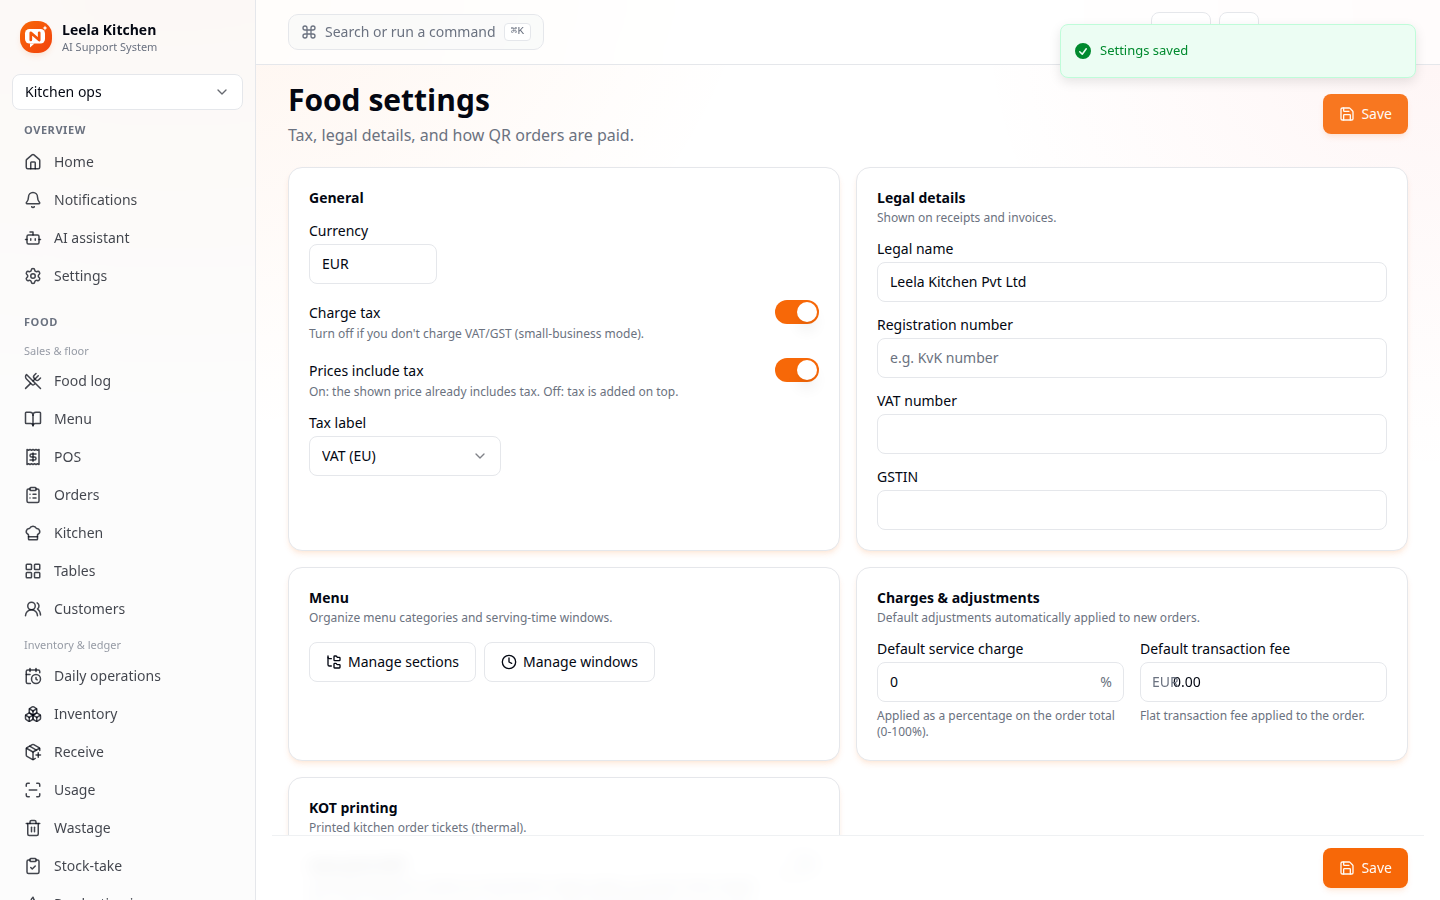
This same screen also has shortcuts to Manage sections and Manage windows for the menu (grouping dishes and limiting them to a time-of-day serving window), and KOT printing for thermal kitchen ticket printers.
Setting up your floor (dine-in only)
If you take orders against physical tables, set up your floor once from Food → Sales & floor → Tables, then Manage tables.
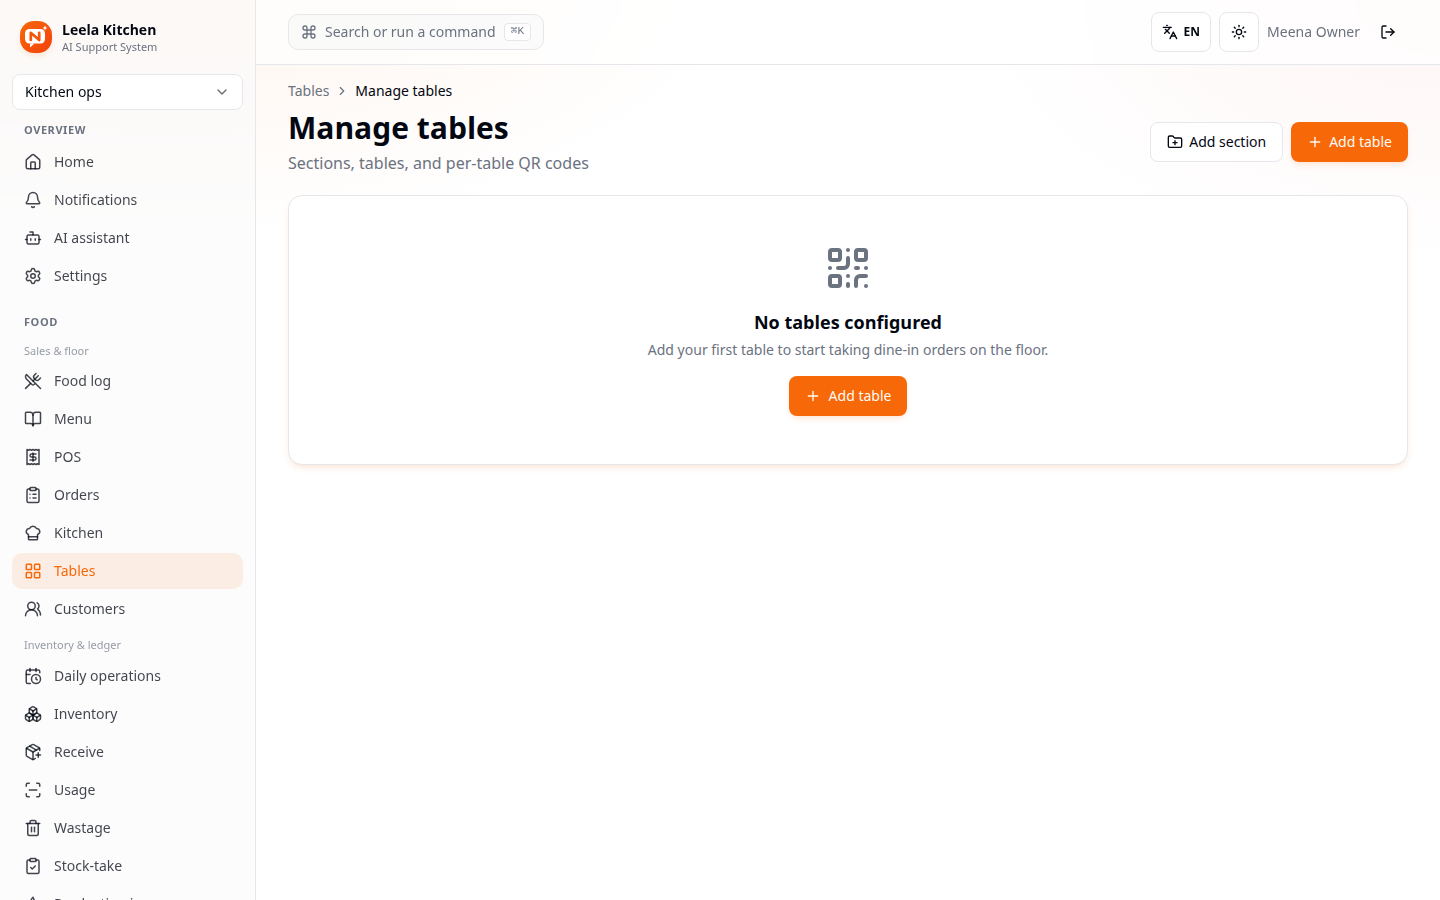
Add section groups tables by area (e.g. "Main Hall", "Patio", "Bar") - purely organizational, so a big floor doesn't turn into one long list.
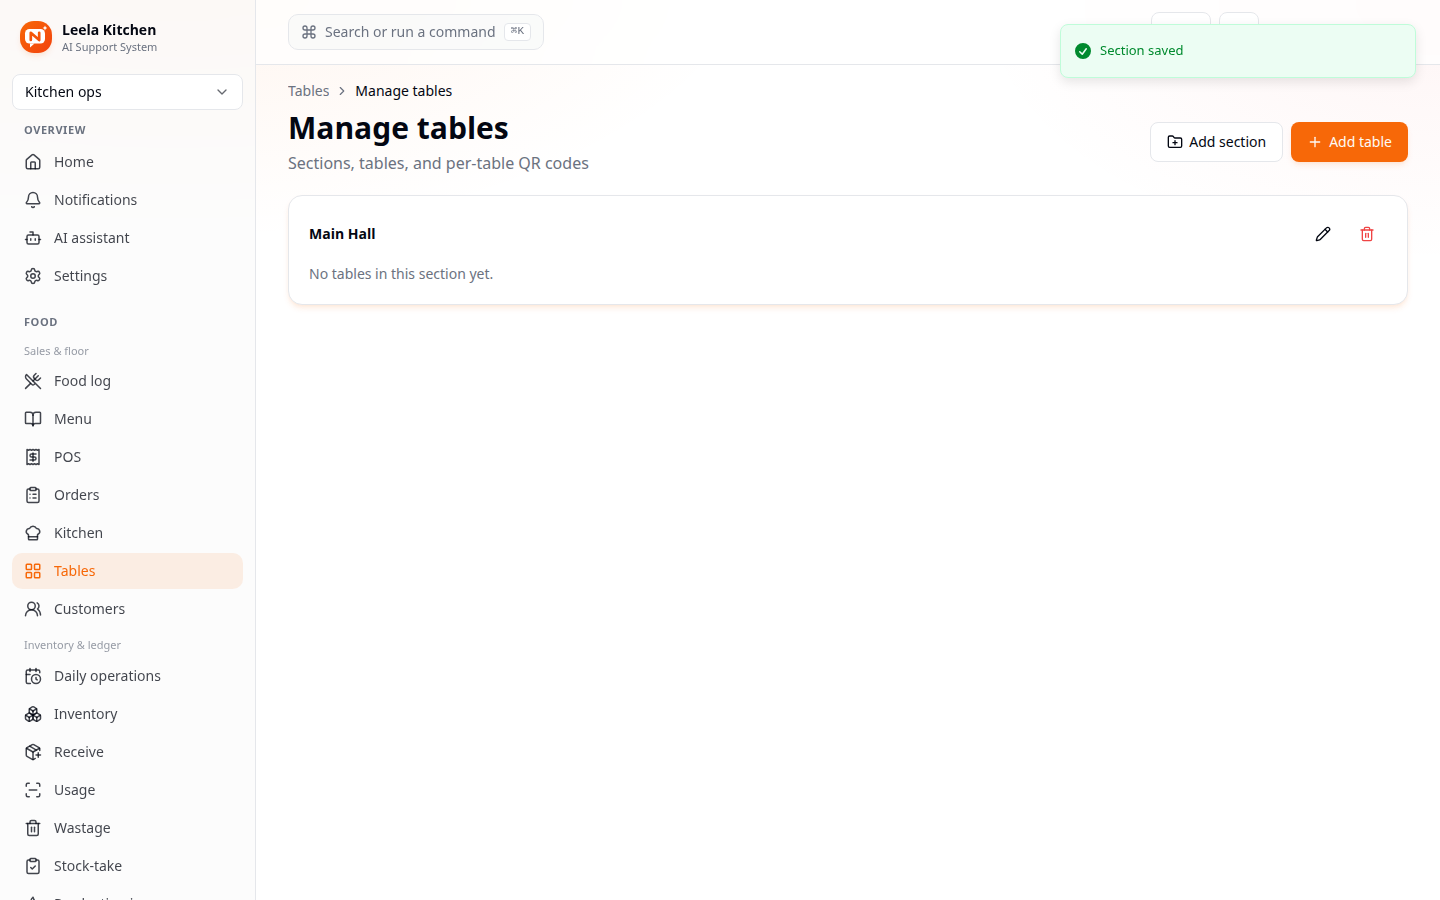
Add table creates a real table with a name and seat count, optionally placed into a section.
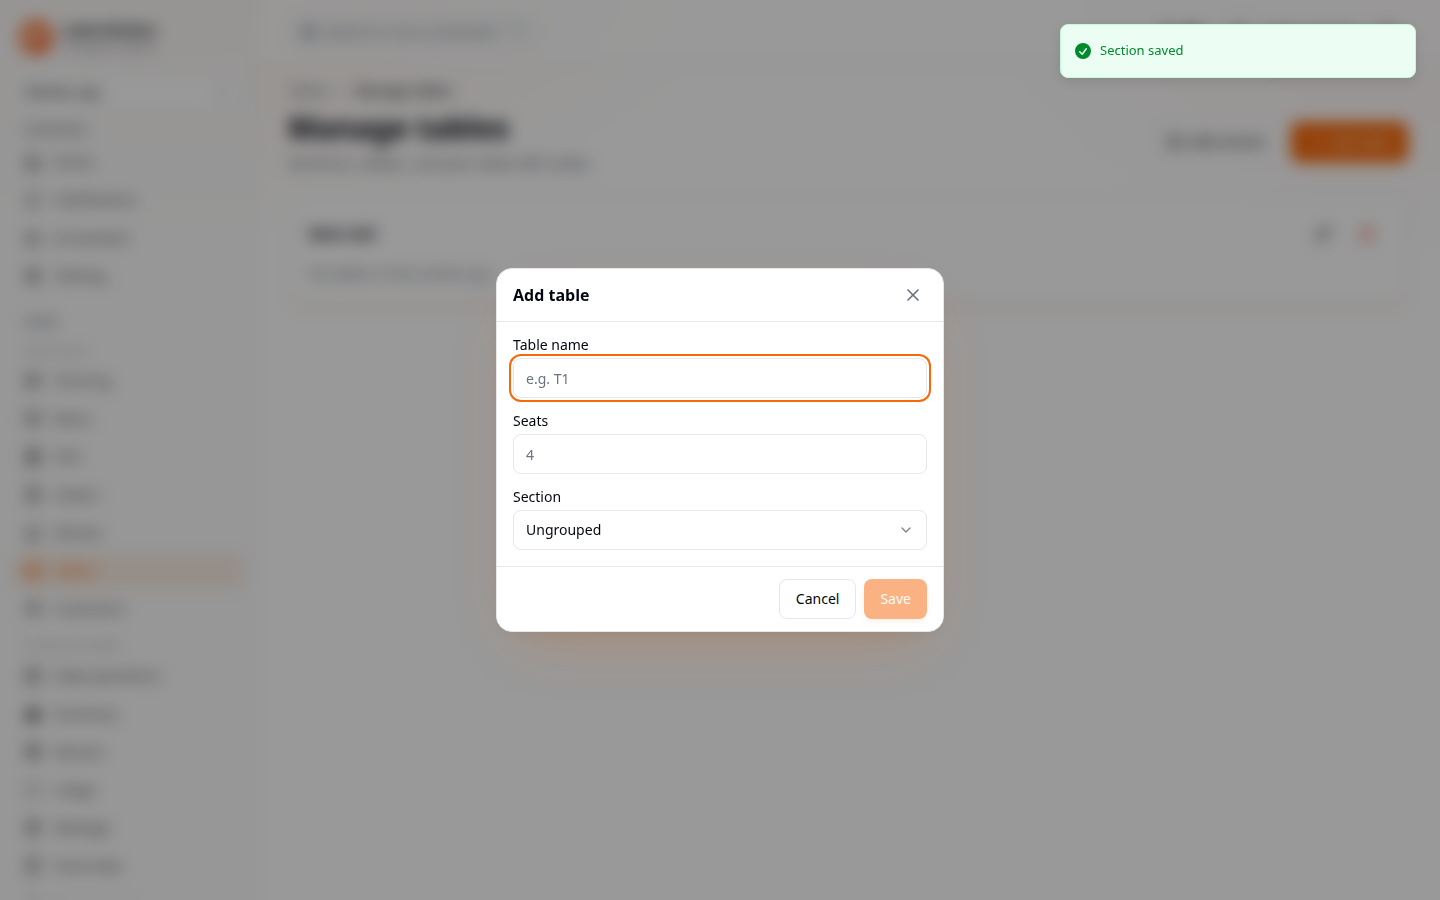
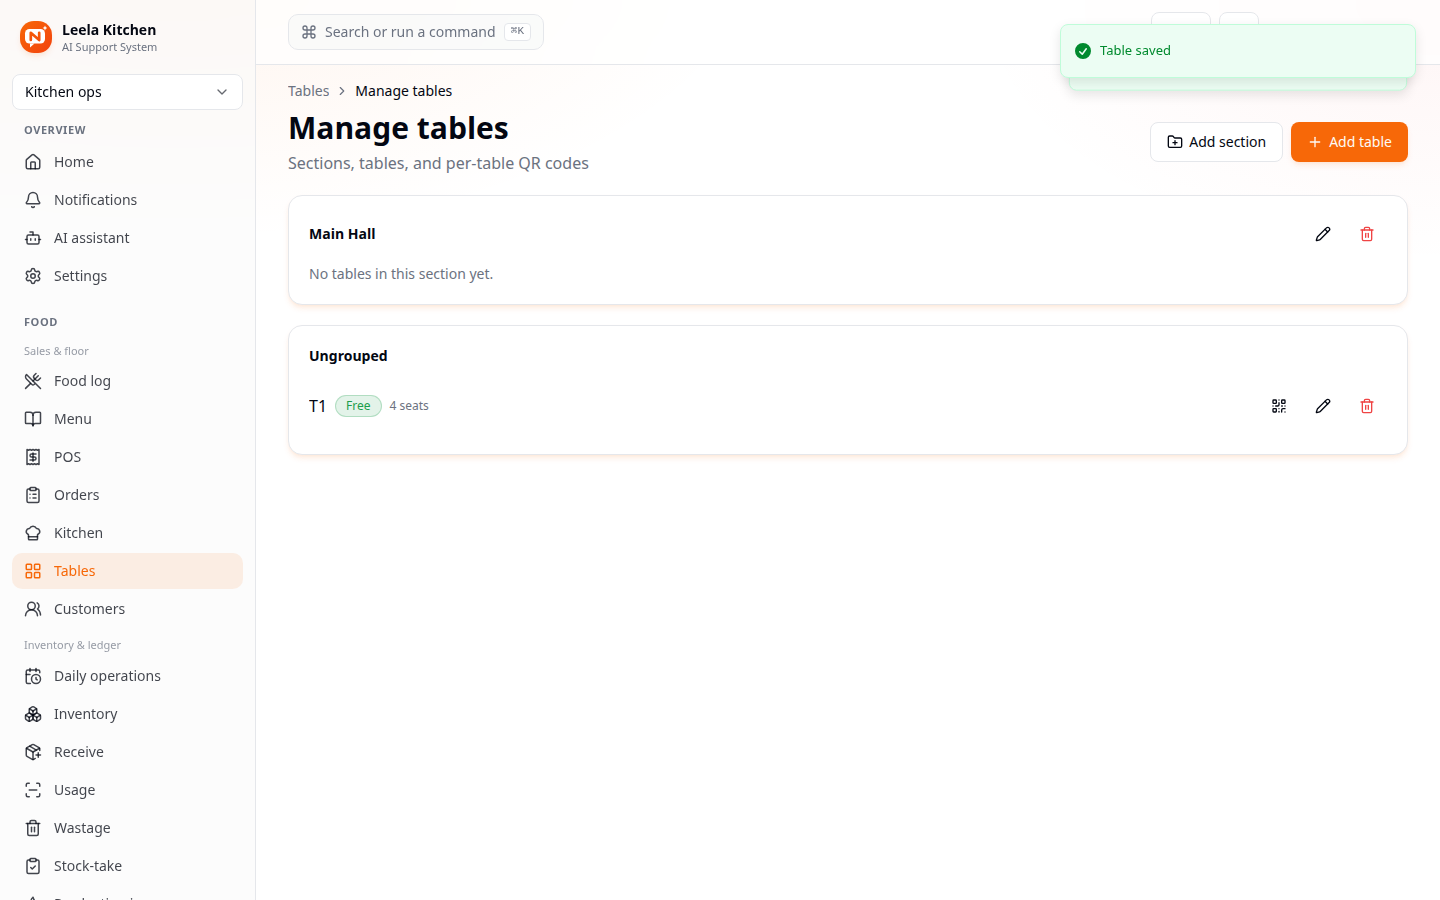
Every table gets its own QR code (the icon next to it) - printed and left on the table, it's how a customer can pull up your public menu and order or ask for the bill from their phone.
The dish and its recipe
Creating a dish
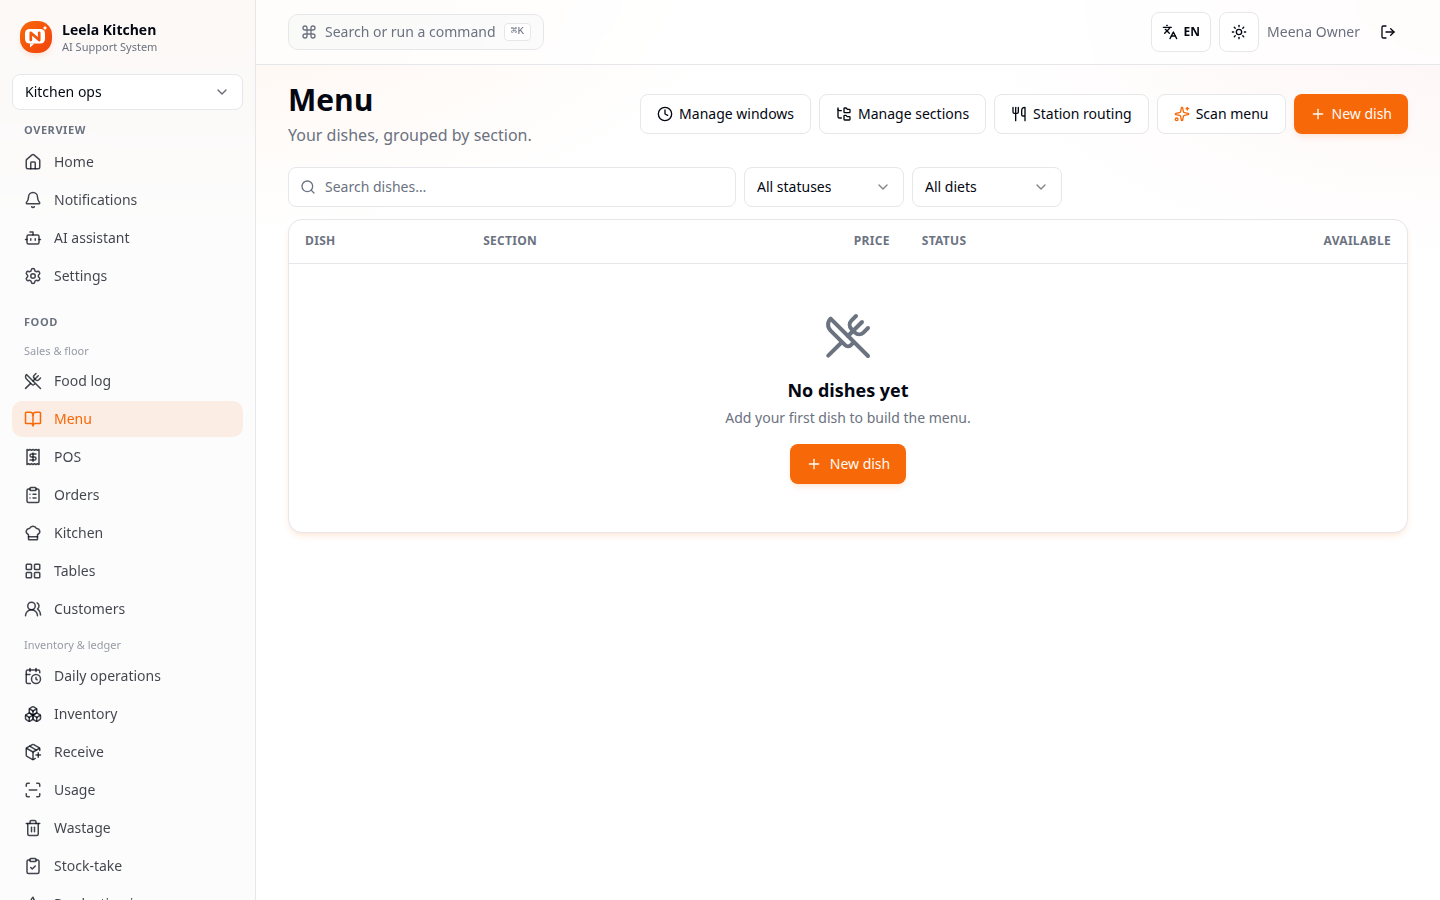
Go to Food → Sales & floor → Menu and click New dish.
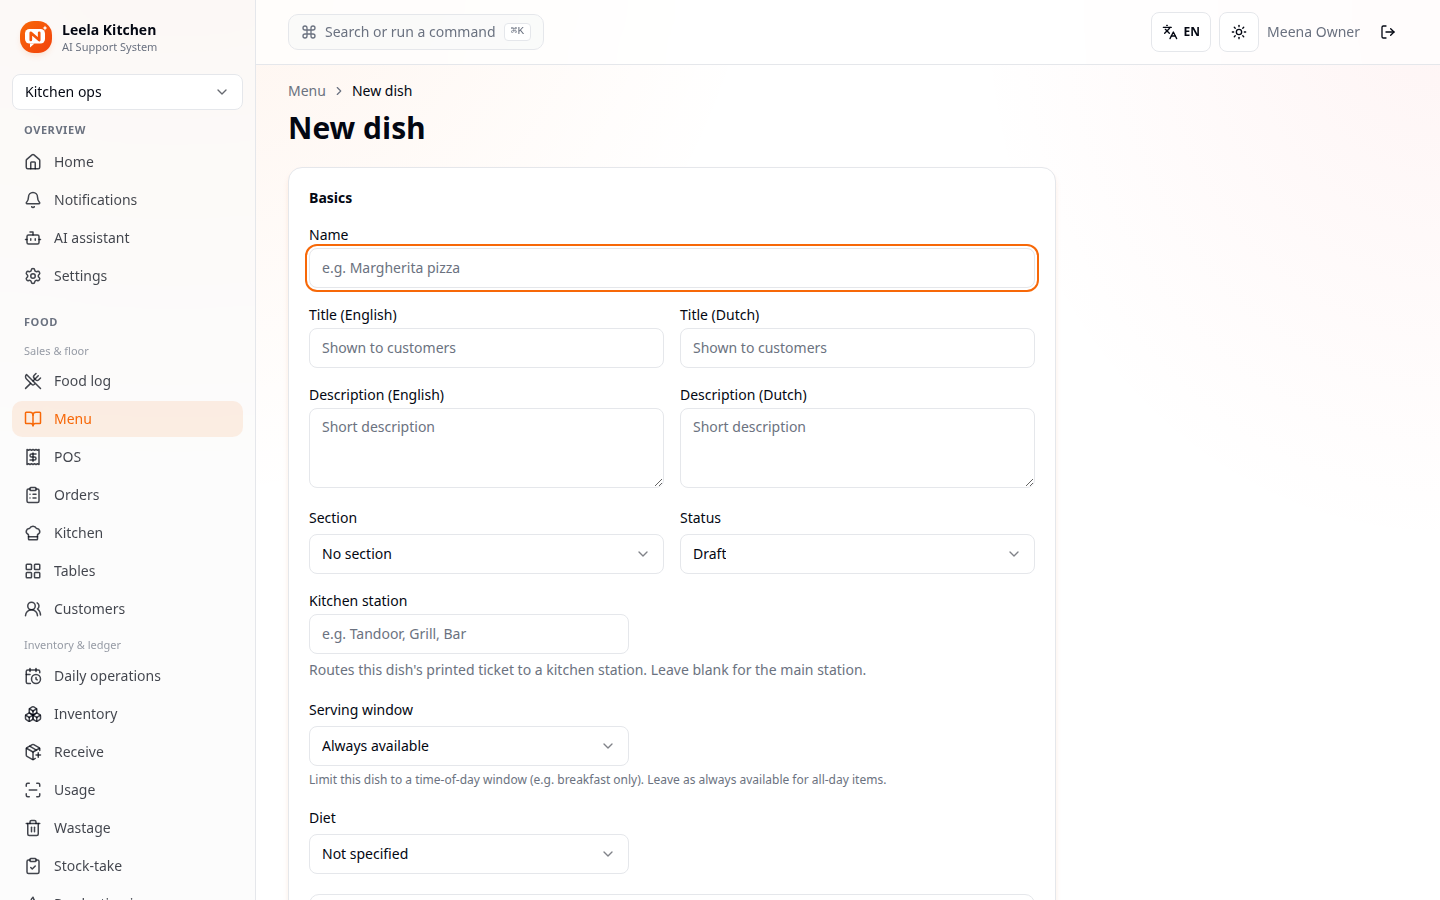
Give the dish a name, an optional customer-facing title/description in each language, a section, a kitchen station (which printer/screen its ticket routes to), and a serving window if it's only sold at certain times. Save it.
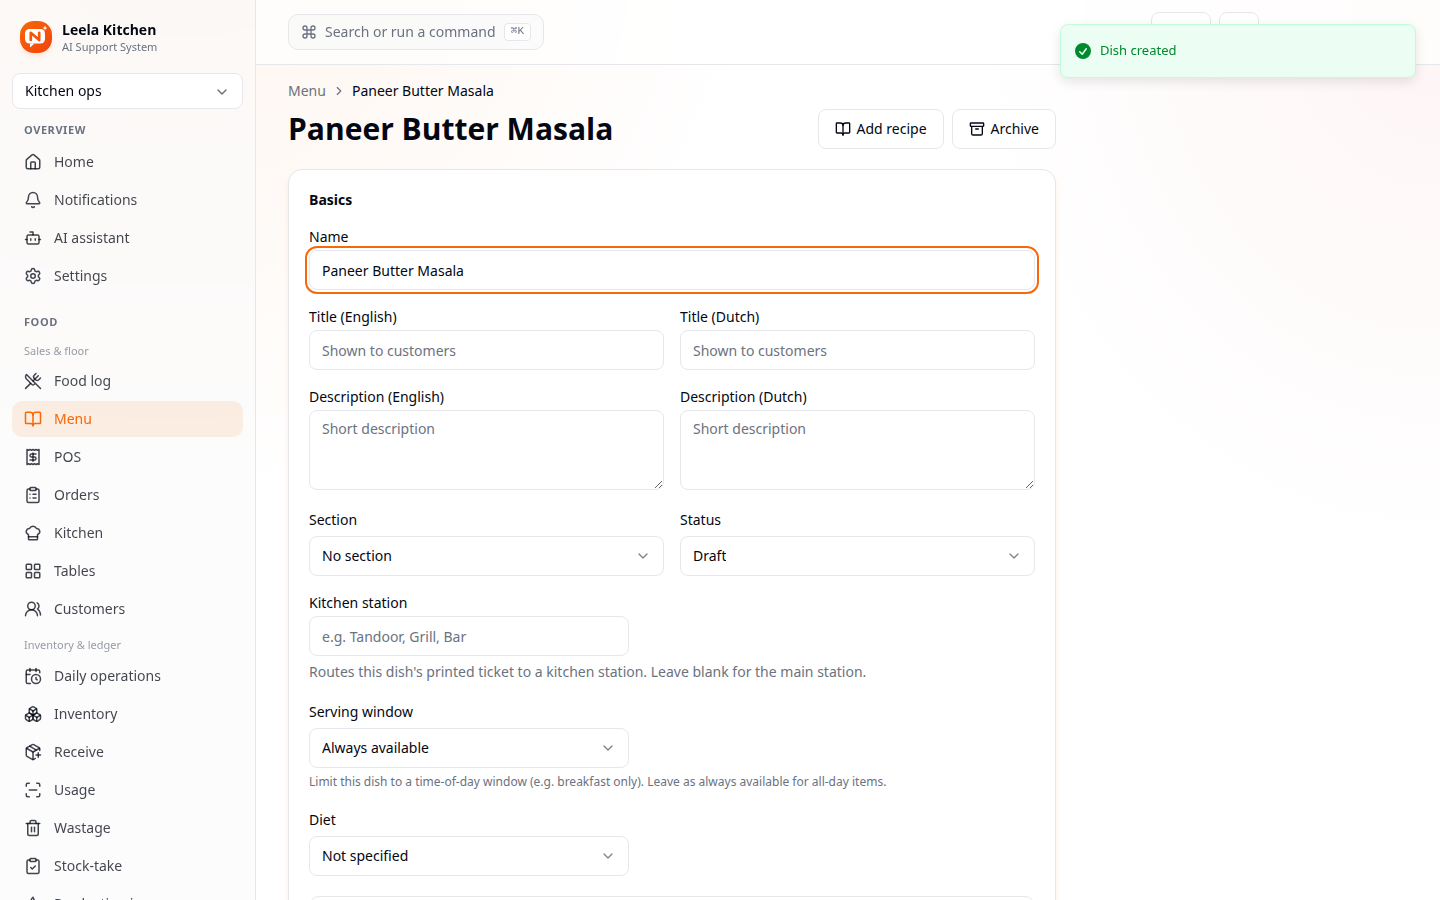
A brand-new dish has no recipe yet - it can be sold, but the app has no idea what it costs or whether you can actually make it. Click Add recipe to fix that.
Building the recipe
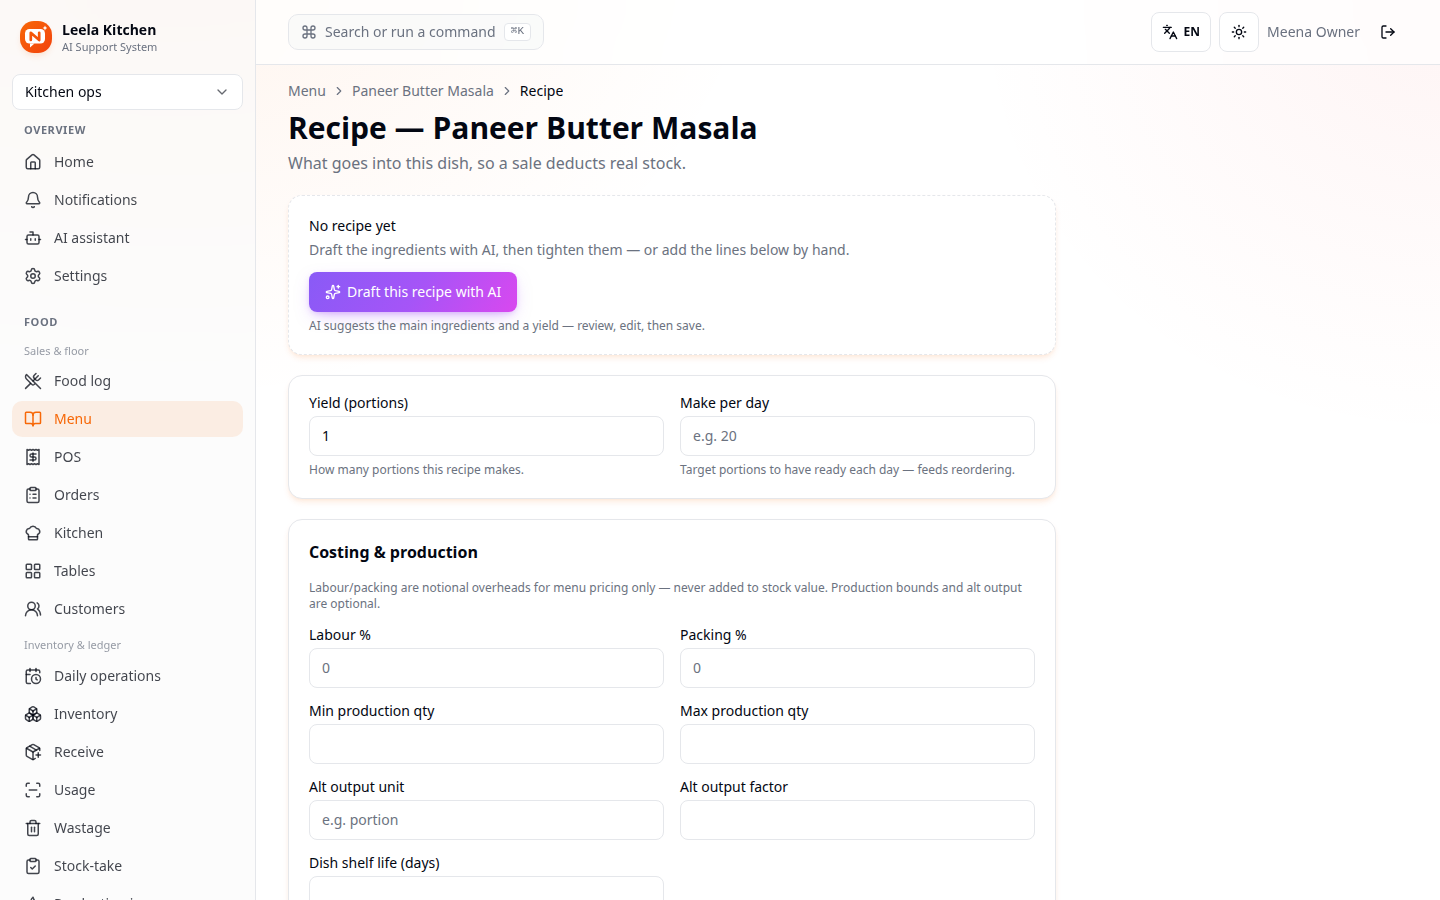
Add ingredients one at a time - search for a real stocked product, then set the quantity used per portion.
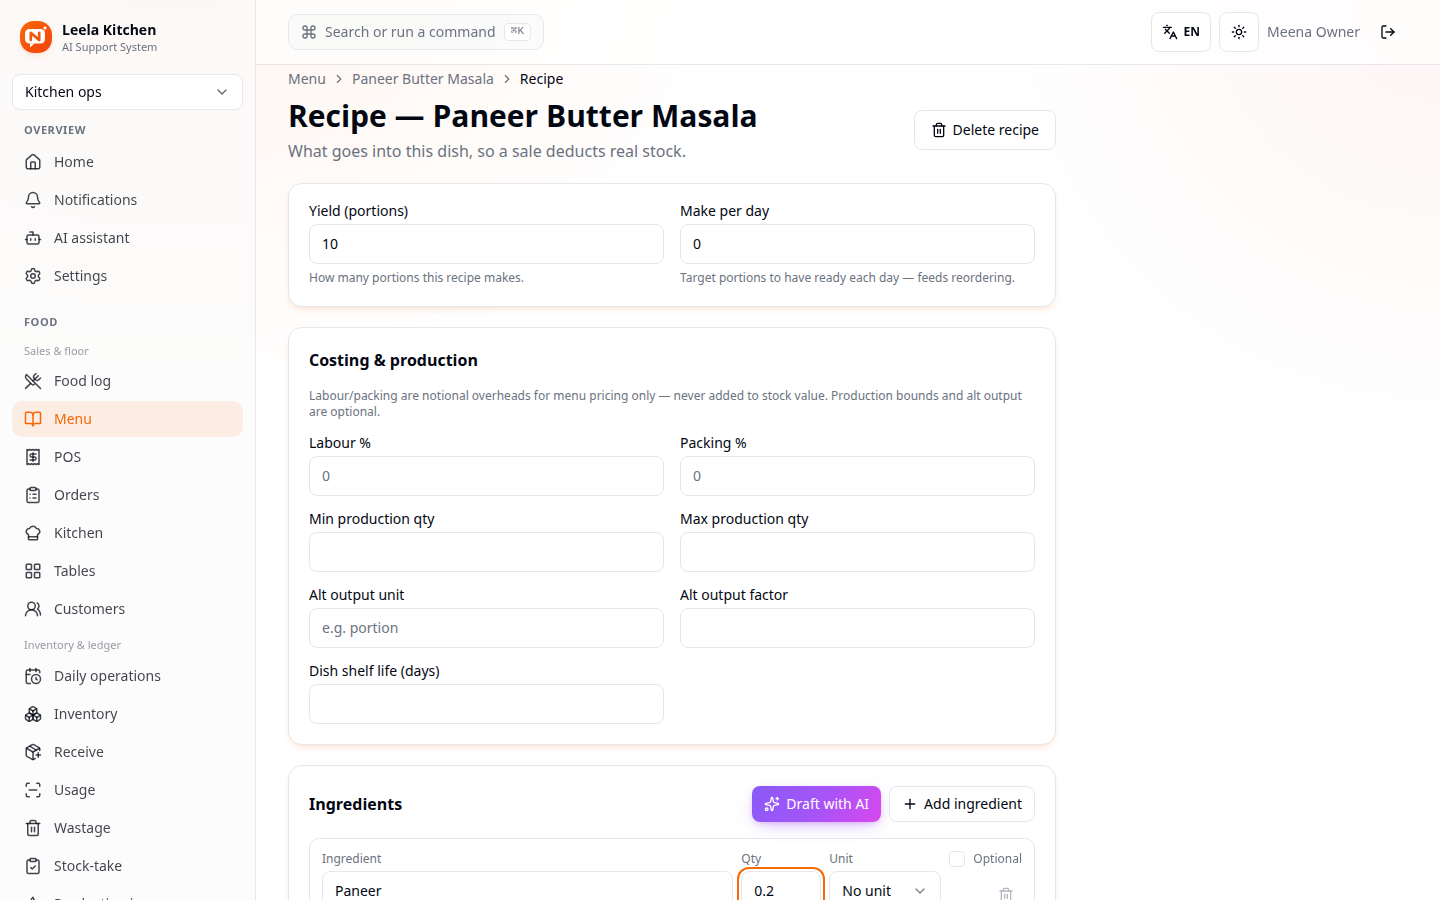
Quantity per portion – This is per ONE portion of the dish, not per batch. Get this right - it drives every cost and stock number below.
There's also a Draft with AI button that proposes a starting ingredient list from the dish name - a fast first draft you still review and adjust, never a substitute for checking real quantities.
Click Save recipe.
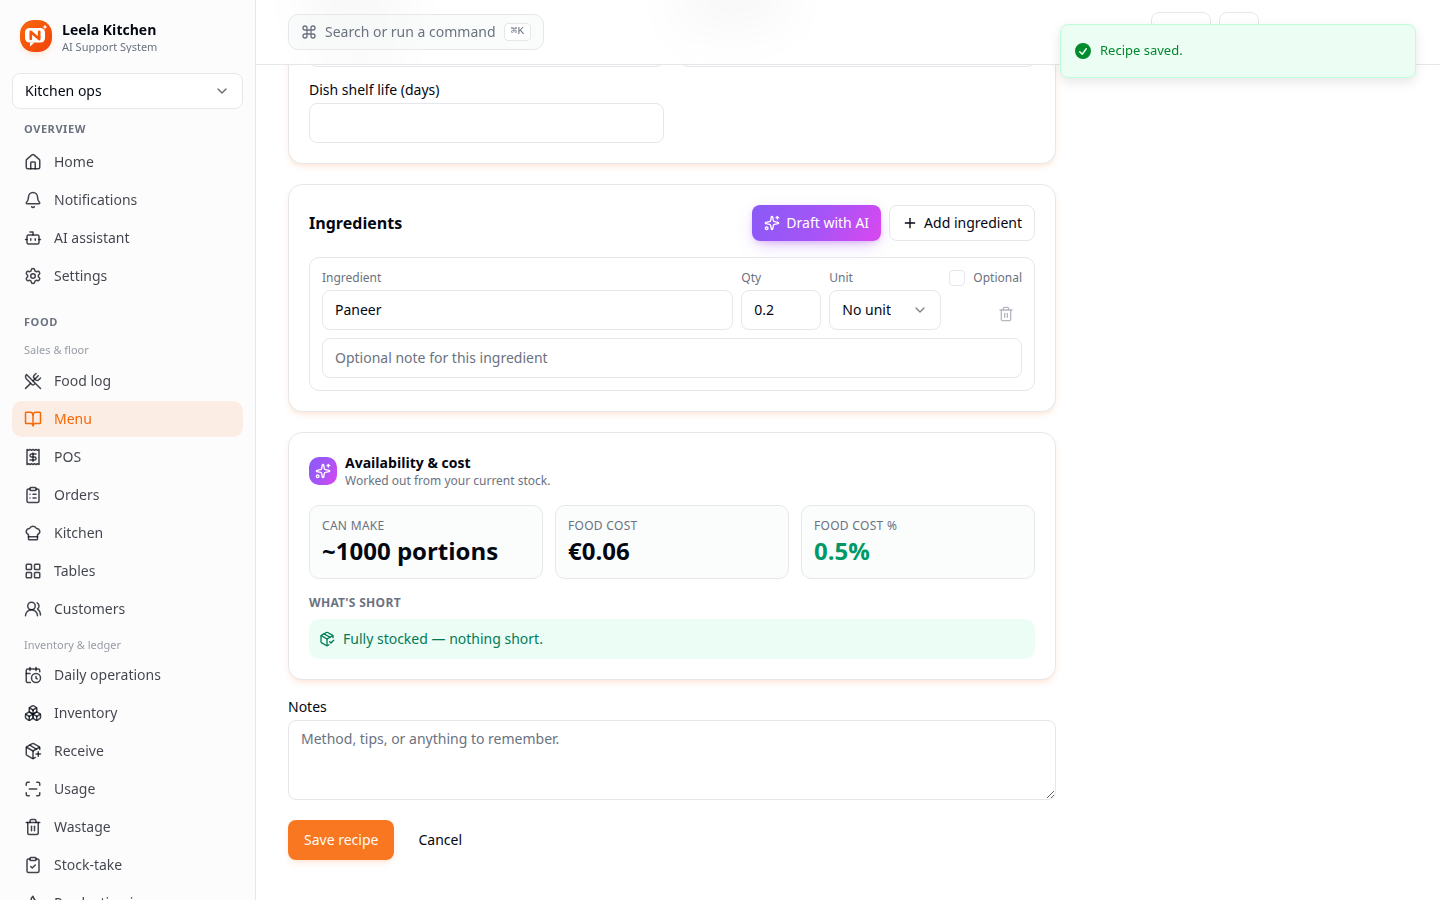
The Availability & cost panel is computed live from your real stock, not typed in by hand:
- Can make - how many portions your current stock supports, given every ingredient's quantity.
- Food cost - the real raw-material cost of one portion, priced from your actual stock (the moving average cost, not a guess).
- Food cost % - that cost as a percentage of the dish's selling price - the number you watch to keep margins healthy.
- What's short - if any ingredient is running low, it's named here so you know before a customer orders it and the kitchen can't make it.
If you never set a quantity for a line, that ingredient is skipped from both "Can make" and the cost - the recipe still saves, but the numbers above won't be trustworthy until every line has a real quantity.
A brand-new dish saves as Status: Draft - it won't show up at the till or on a table's order screen yet. Open the dish and set Status to Active once it's ready to actually sell.
Kitchen POS: a focus shell for service
Everything above is back-office work you do at a desk. Service is different - you're on a tablet by the pass or a screen on the wall, one-handed, and you don't want an admin sidebar in the way.
Kitchen POS is a separate, installable terminal app for exactly that. Open
it from the Kitchen POS button pinned at the top of the sidebar (or
Settings → Open Kitchen POS, or go straight to /kitchen). It uses the
same login as the main app - there's no second account to manage.
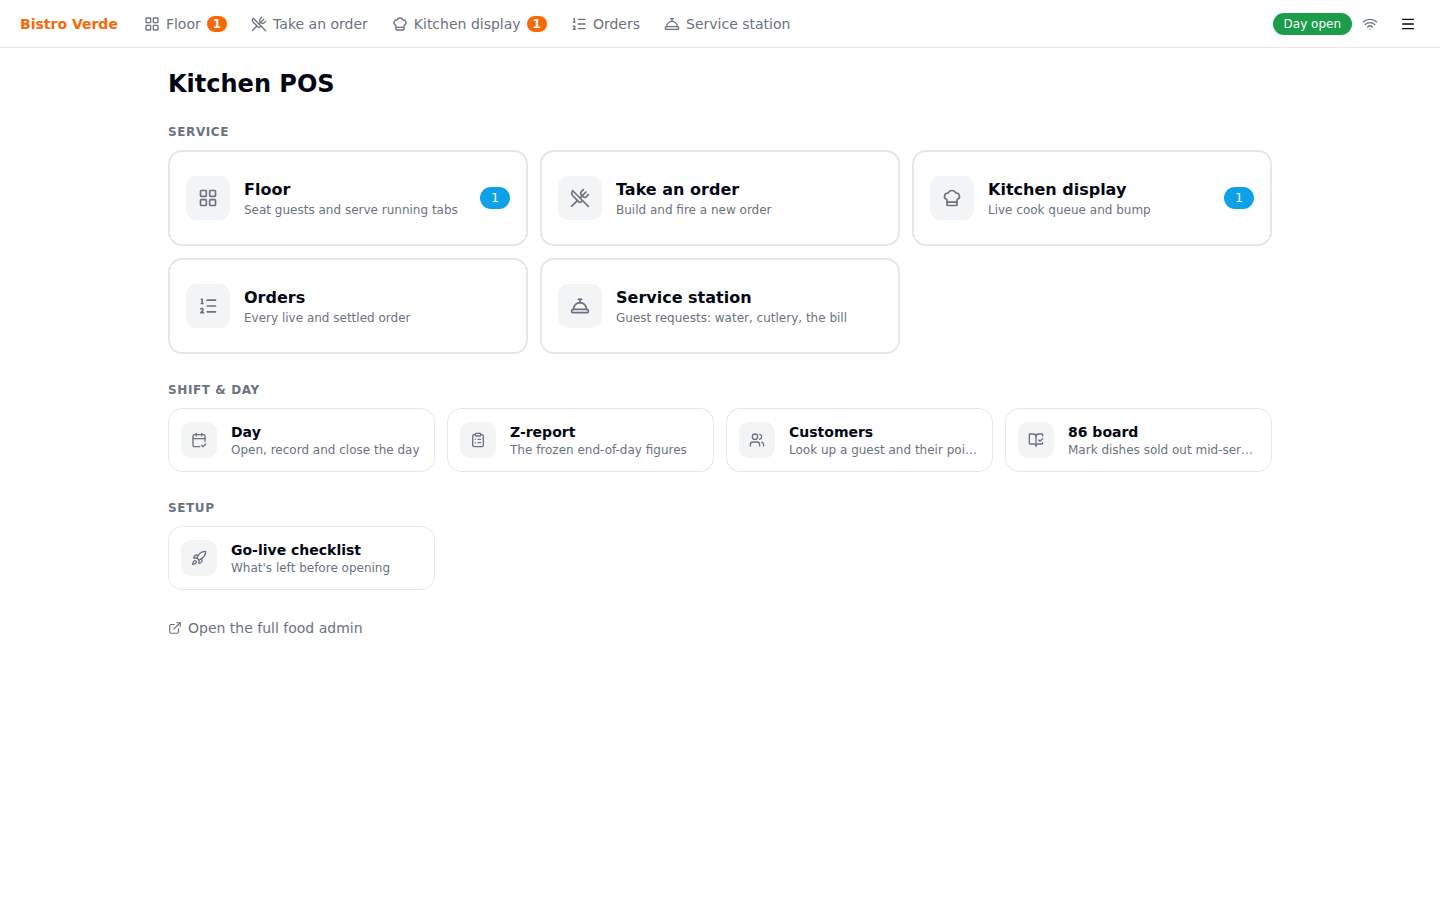
The service bar, on every screen – Floor, Take an order, Kitchen display, Orders and Service station stay one tap apart wherever you are - you never have to come back here to cross the app. Waiting tickets and ringing tables show as badges right in the bar.
The five service tiles – The same surfaces as large targets, because they're tapped constantly during a rush.
Live day status – Tells you at a glance whether the day is open, alongside a connection indicator.
Quieter rows – Shift & day (day, Z-report, customers, the 86 board) and Setup (the go-live checklist) - reference work, not service work, so they're deliberately smaller.
Because it's a real installable app, you can add it to a tablet's home screen and it opens fullscreen with no browser chrome. Anything not on this hub - menu editing, recipes, purchasing, reports - is one tap away under Open the full food admin.
The retail Commerce POS works exactly the same way - same bar, same tile grouping, same status chips. If you run both a shop and a kitchen, learning one teaches you the other.
The floor, at a glance
Floor is where most shifts start: every table in every section, colour-coded by state.
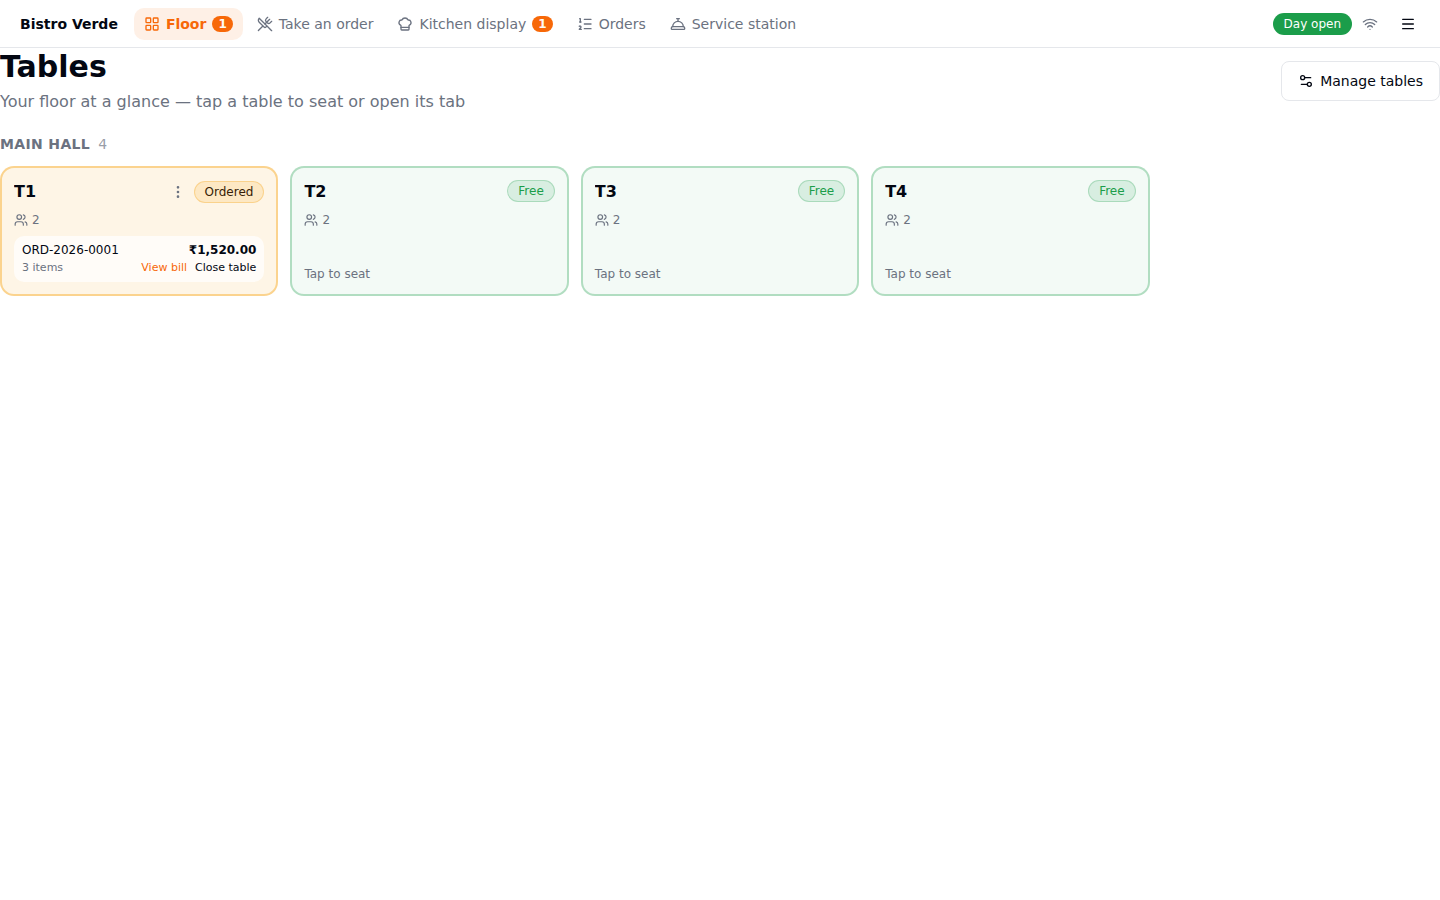
An occupied table shows its order number, item count and running total right on the card, with View bill and Close table in reach. A free table just says Tap to seat. The badge on the Floor tab counts occupied tables, so you can see the room filling up from any other screen.
Today's tickets
Orders is the counter view of the same service - every ticket taken today, whichever screen it came from.
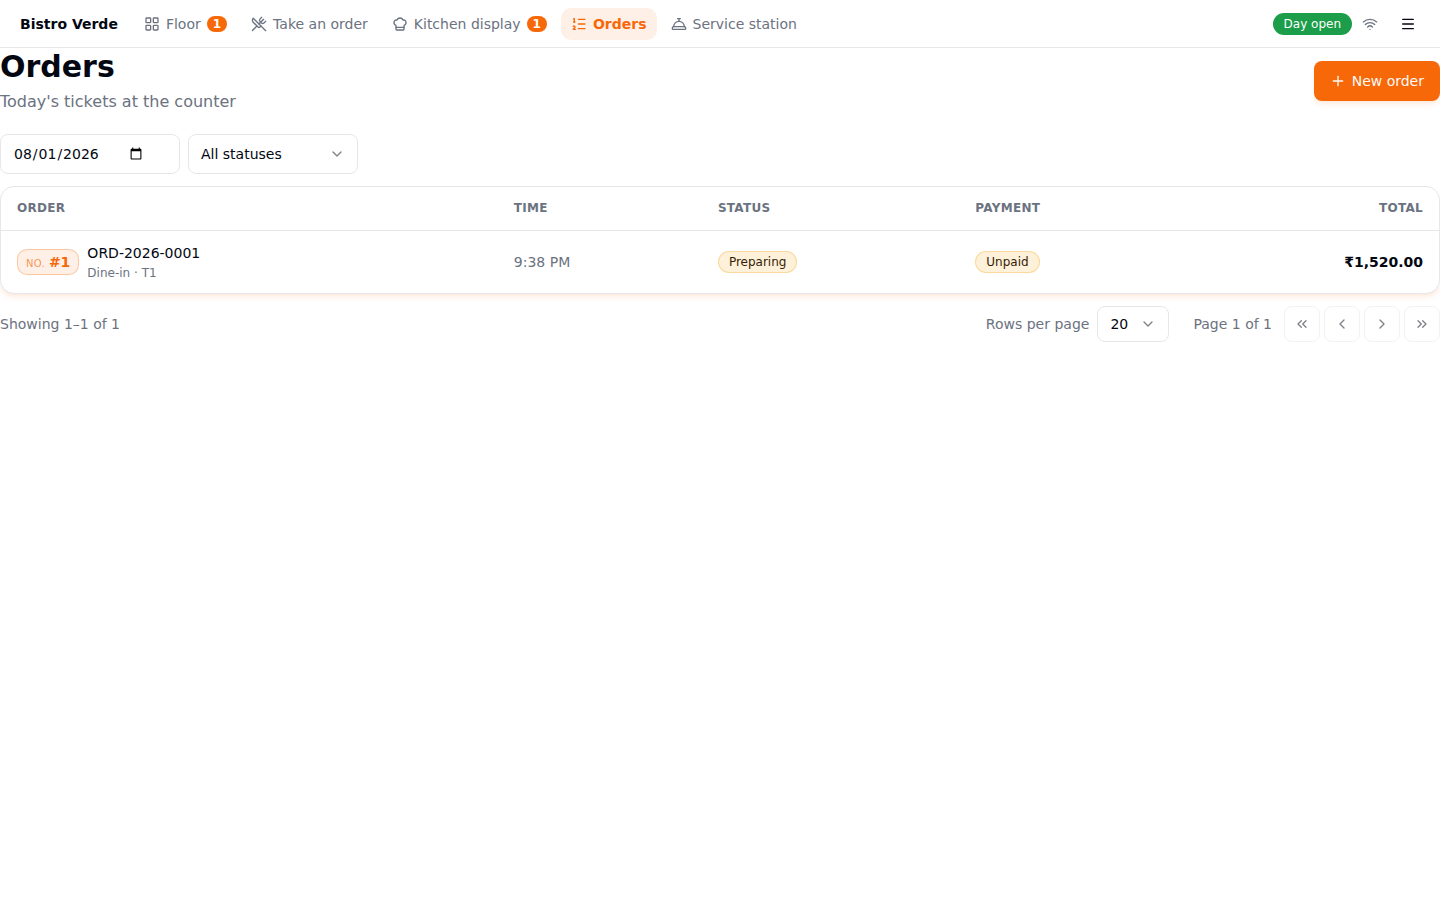
Each row carries its call number, type and table, how far along the kitchen is (Preparing, Ready), and whether it's been paid. Filter by date or status when you're looking for one particular ticket; New order starts a fresh one without going back to the hub.
The 86 board
Mid-service, the only menu edit that matters is "we've run out". The 86 board is a big-target grid of every active dish, grouped by menu section.
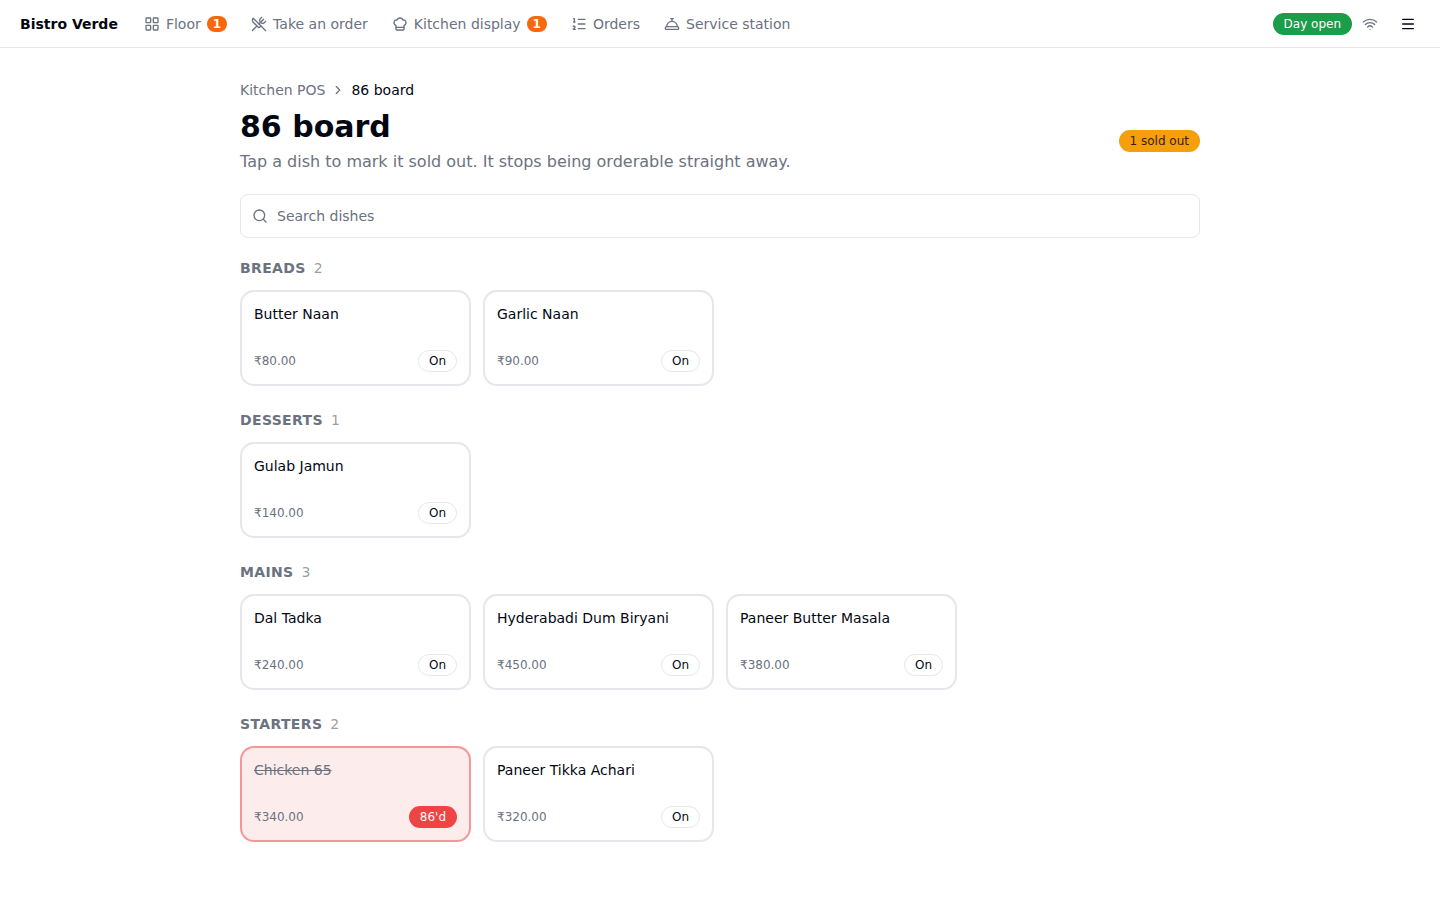
Tap to 86 a dish – One tap marks it sold out - it turns red, and it stops being orderable at the counter straight away. Tap again to bring it back.
The kitchen display, fullscreen
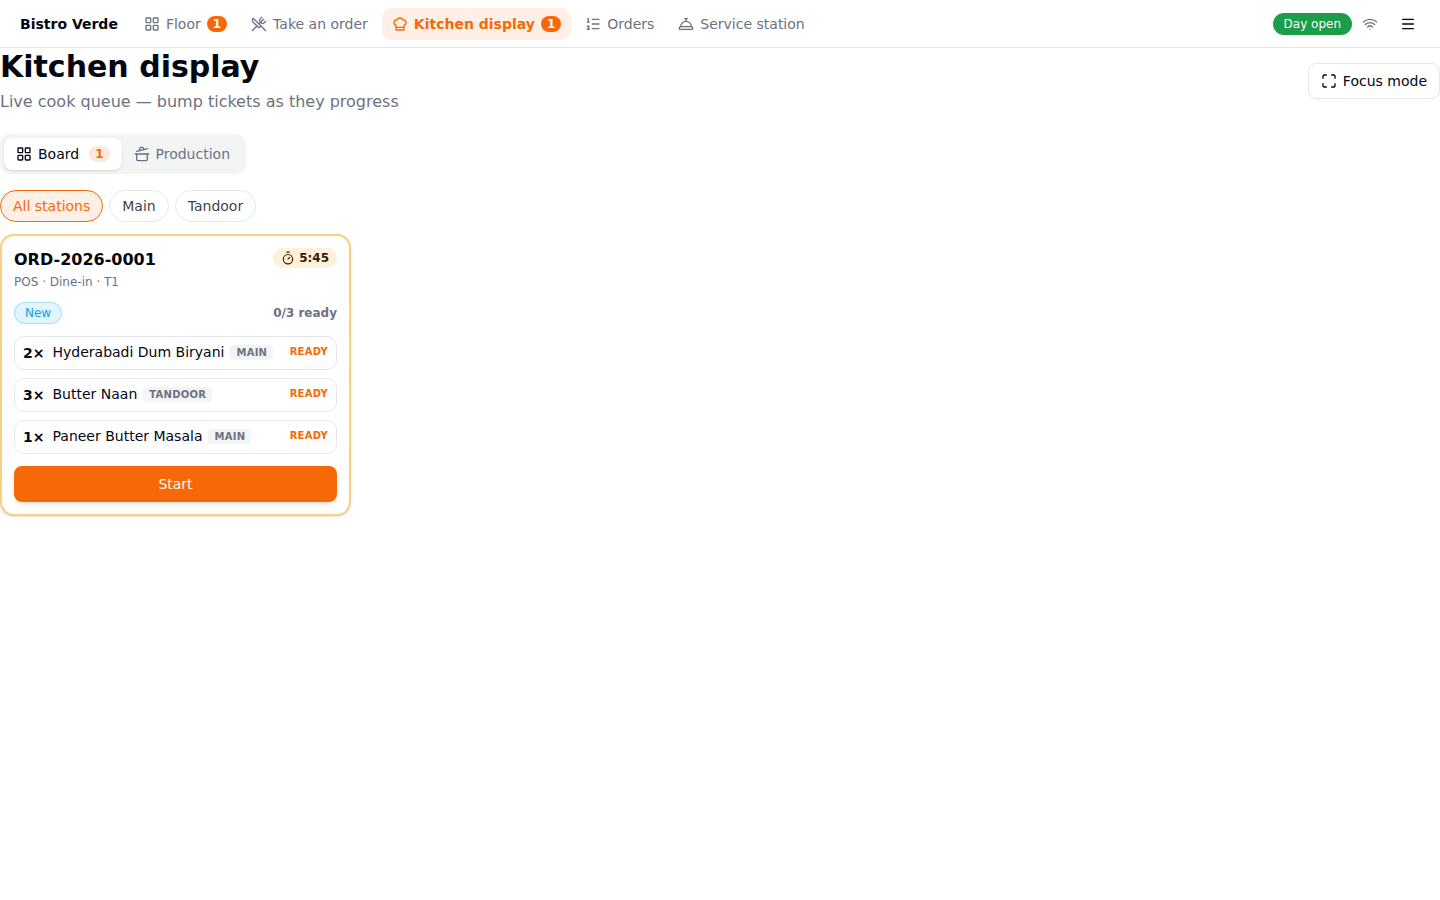
The KDS in the focus shell has a Focus mode button that puts the board into real fullscreen - the right setting for a screen mounted above the pass.
Go-live checklist
Before your first real service, the checklist tracks what still has to be true. It's ADMIN/OWNER only.
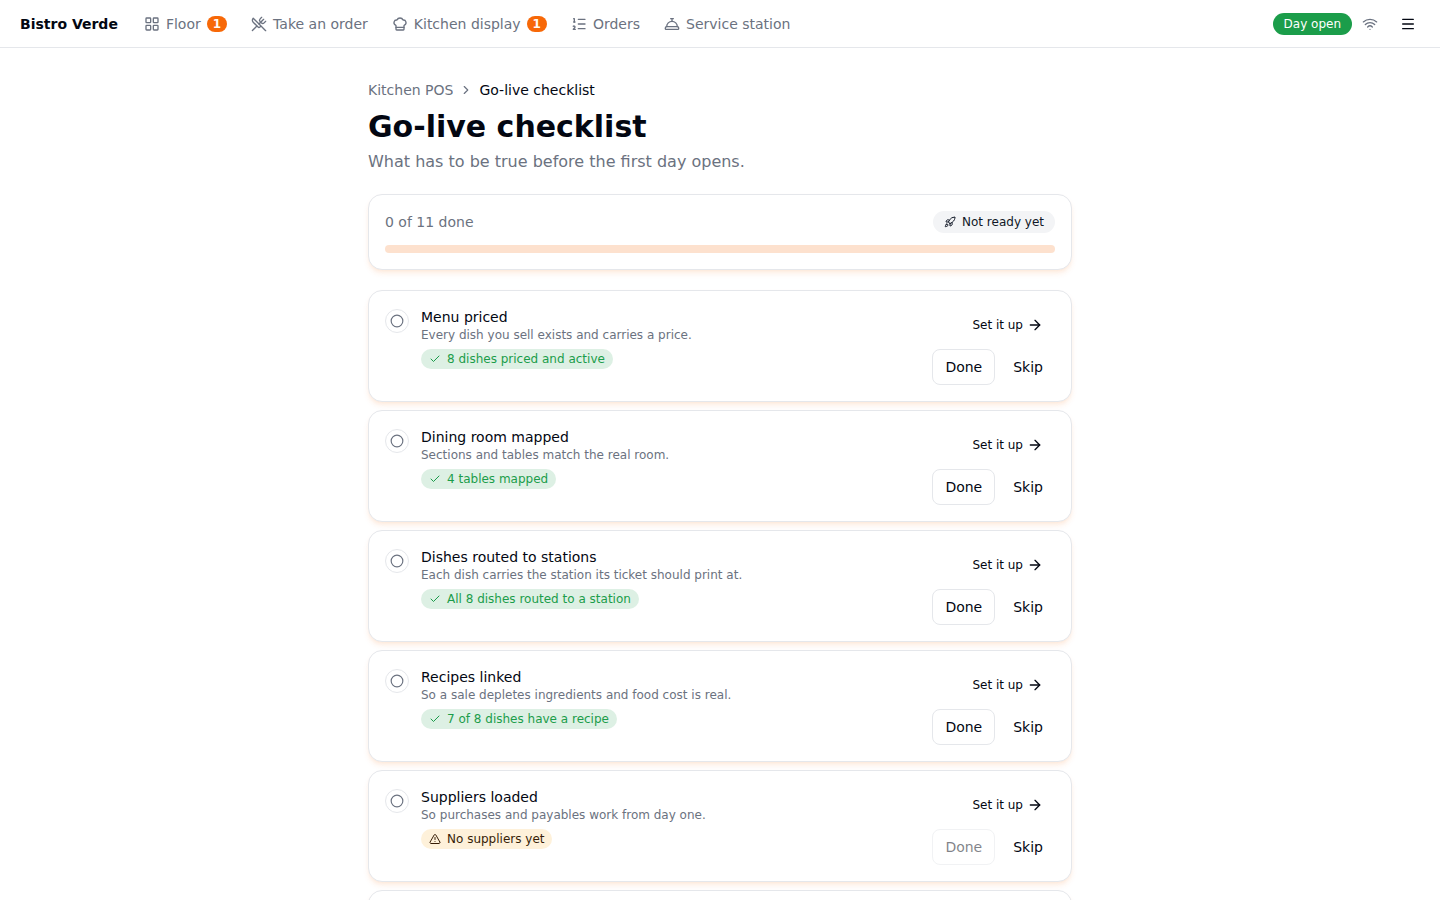
Progress and readiness – Shows how many steps are resolved and whether you're ready to open.
Done or Skip – Skip is a real answer - a takeaway-only kitchen has no floor to map, and skipping doesn't block you from opening.
The two reconcile steps (stock value, supplier outstanding) also hold a pair of figures - what your old system says, and what this one says. They can't be marked done until those two match, which is the point: it's the last check before the numbers become your books.
Taking an order at the terminal
The order screen uses the same four-region terminal layout as the retail till: menu sections down the left, dish tiles in the middle, the running order on the right, and a button bar along the bottom.
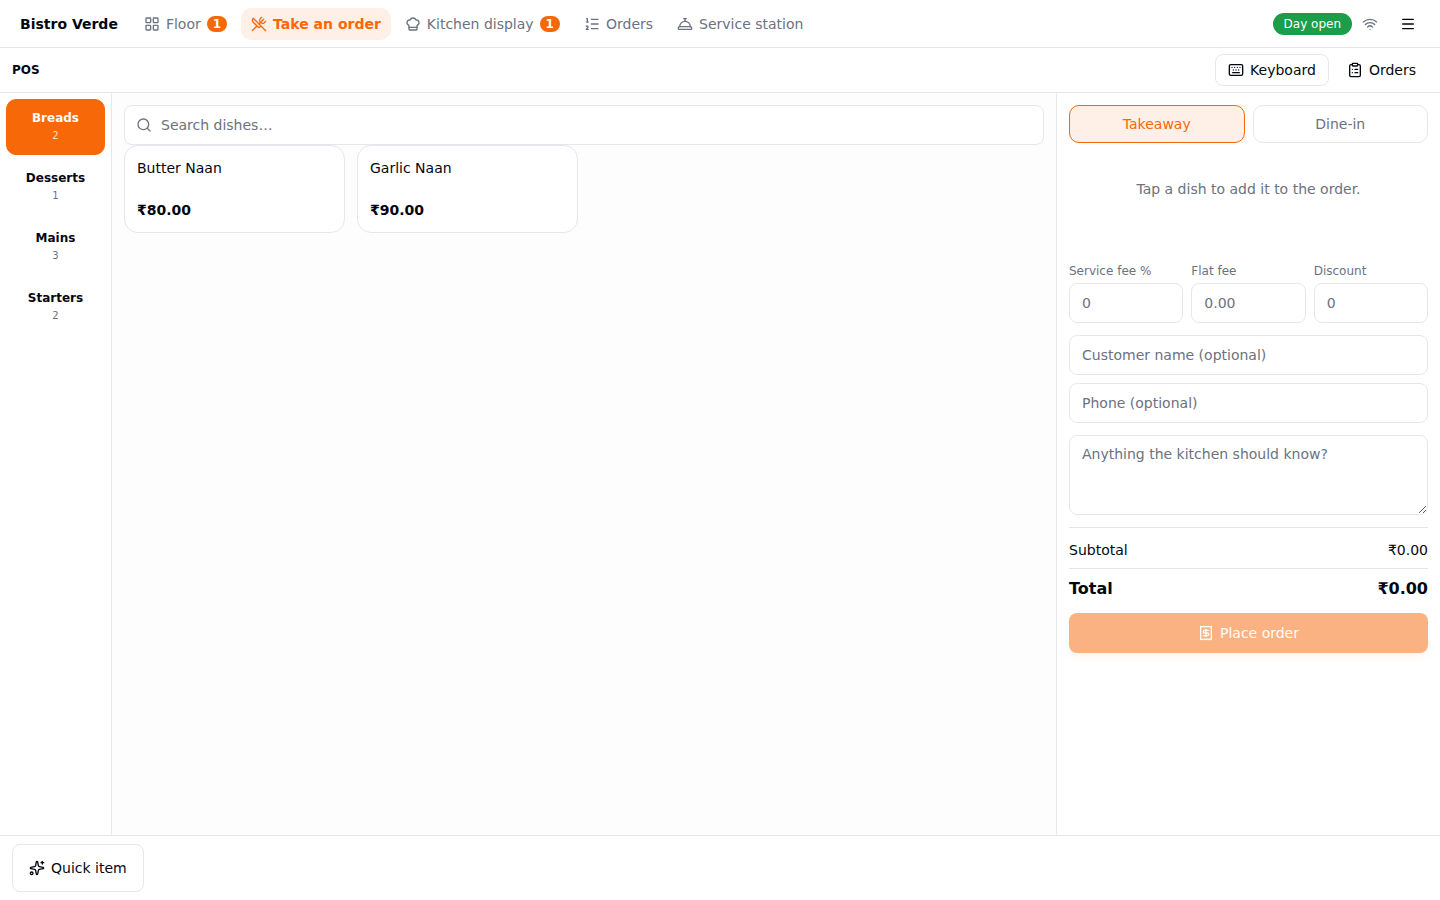
Menu sections – Each section is a big tap target with its dish count. Searching hides the rail and matches across every section at once.
Dish tiles – One tap adds the dish. A dish with variants or modifiers asks for those first.
The order, then Place order – Lines, fees, discount and the customer all live in the right column, with the total and Place order pinned under them.
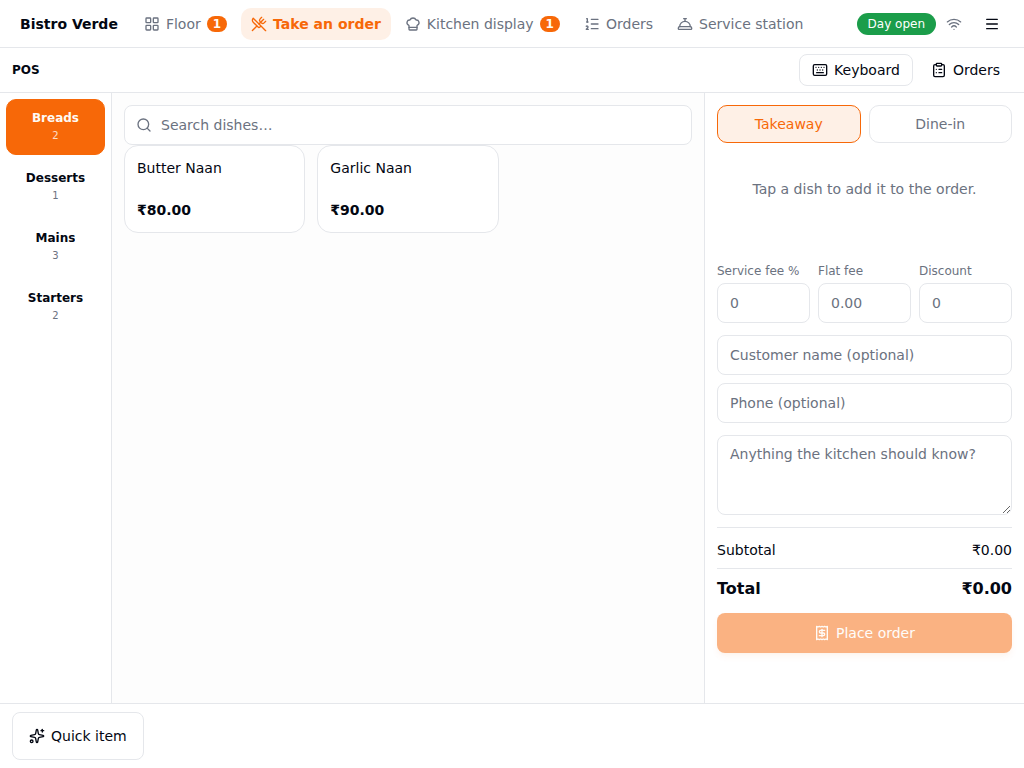
It's built for the screen sizes these terminals actually ship with - nothing scrolls as a page, so the total and the order button stay put even at 1024x768:
Taking a dine-in order: floor to kitchen
With a table set up and the dish set to Active, here's the front-of-house loop that gets an order from a customer's table to the cook's screen. You can run this from the main app, or from Kitchen POS - the screens are the same.
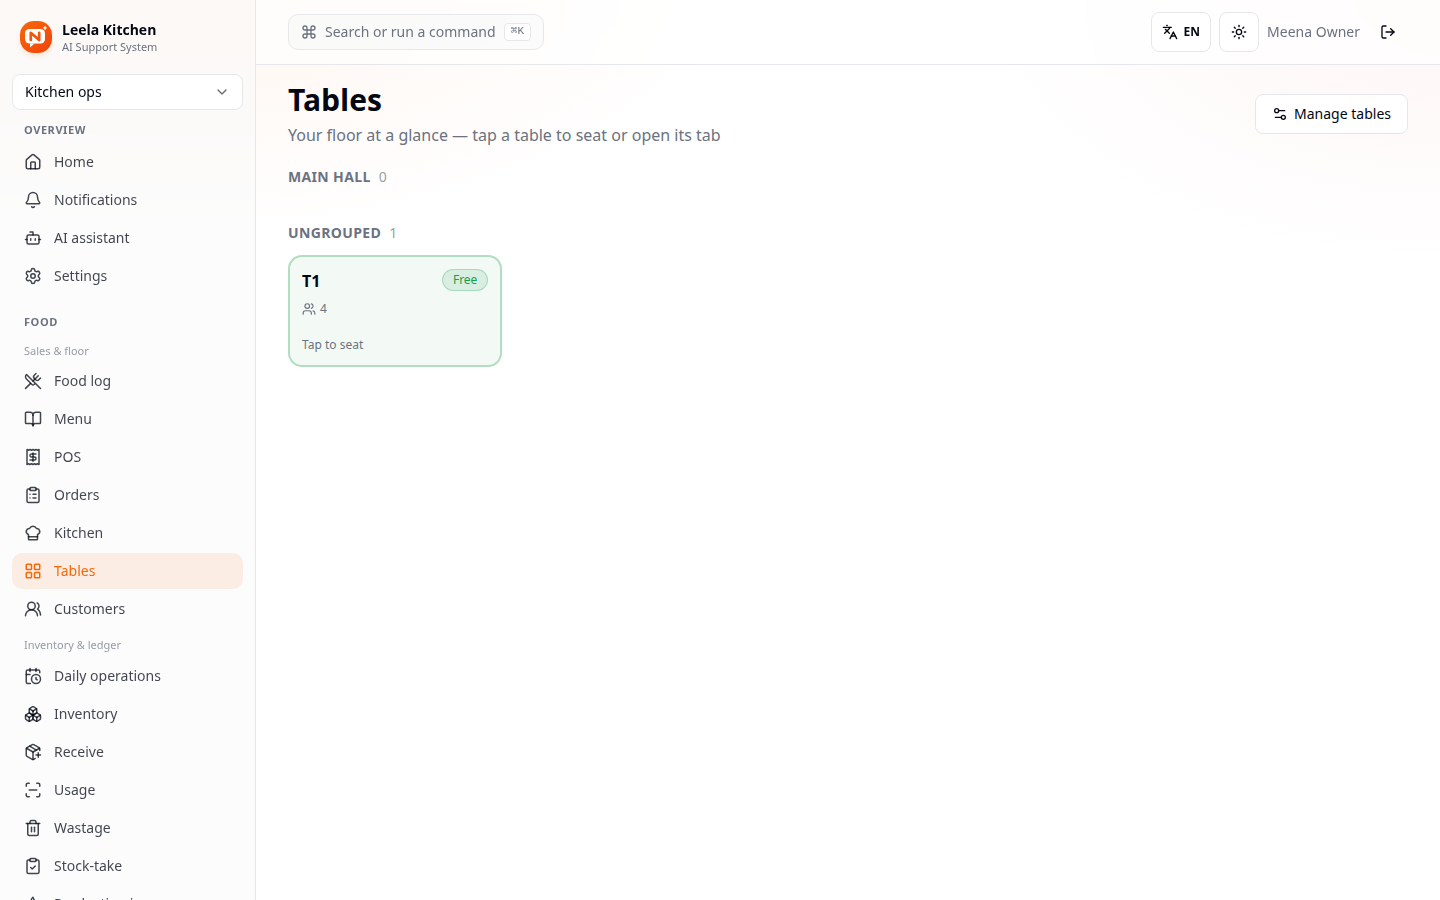
Tap the table – Go to Tables to see your floor at a glance. Tap a free table to seat it.
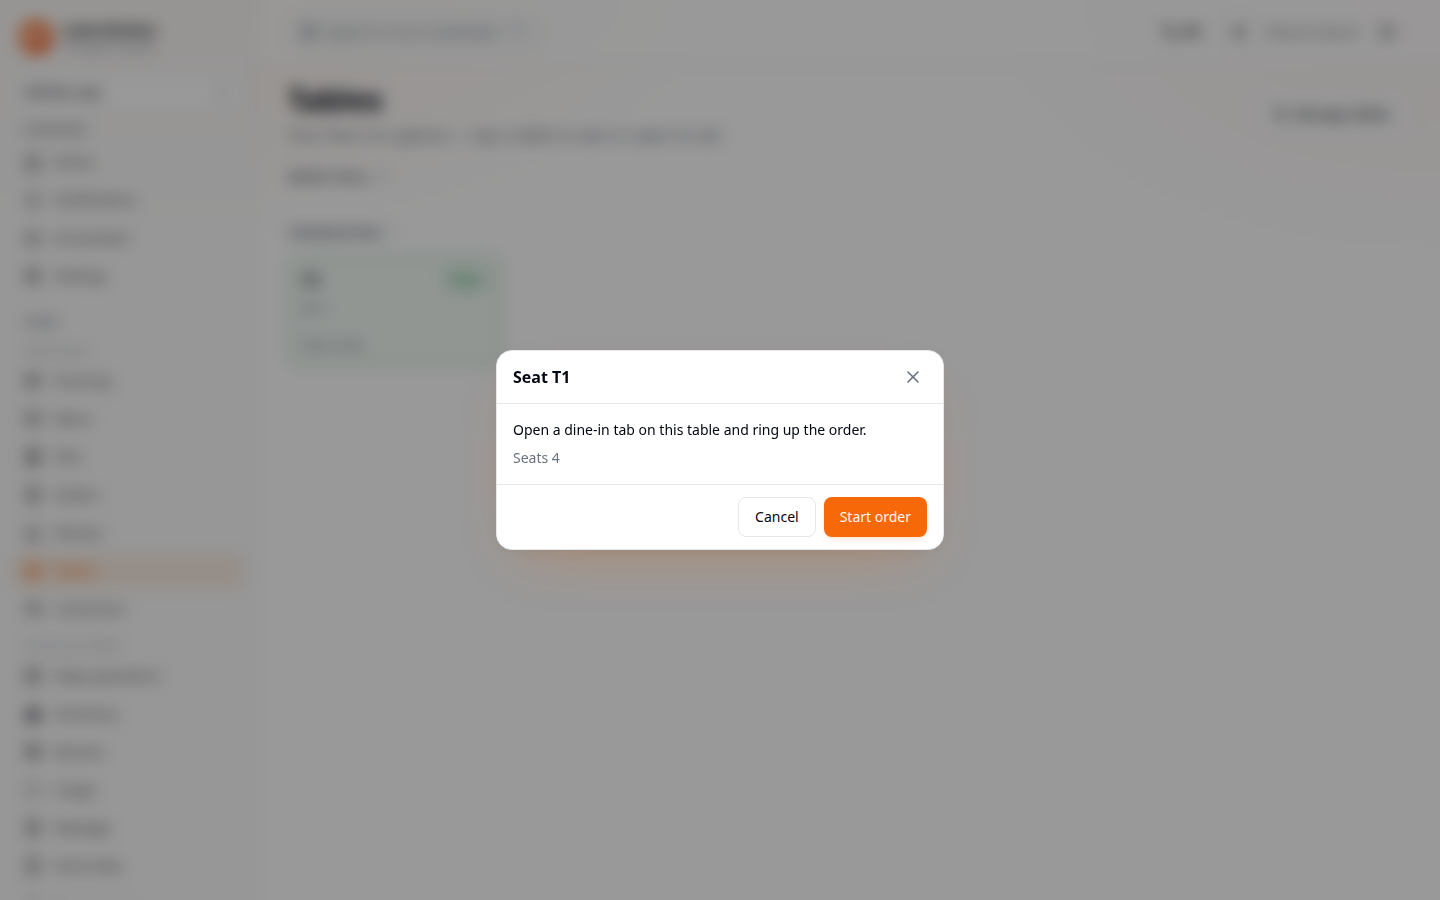
Start order opens a dine-in tab on that table and takes you straight into the POS order screen, already set to that table.
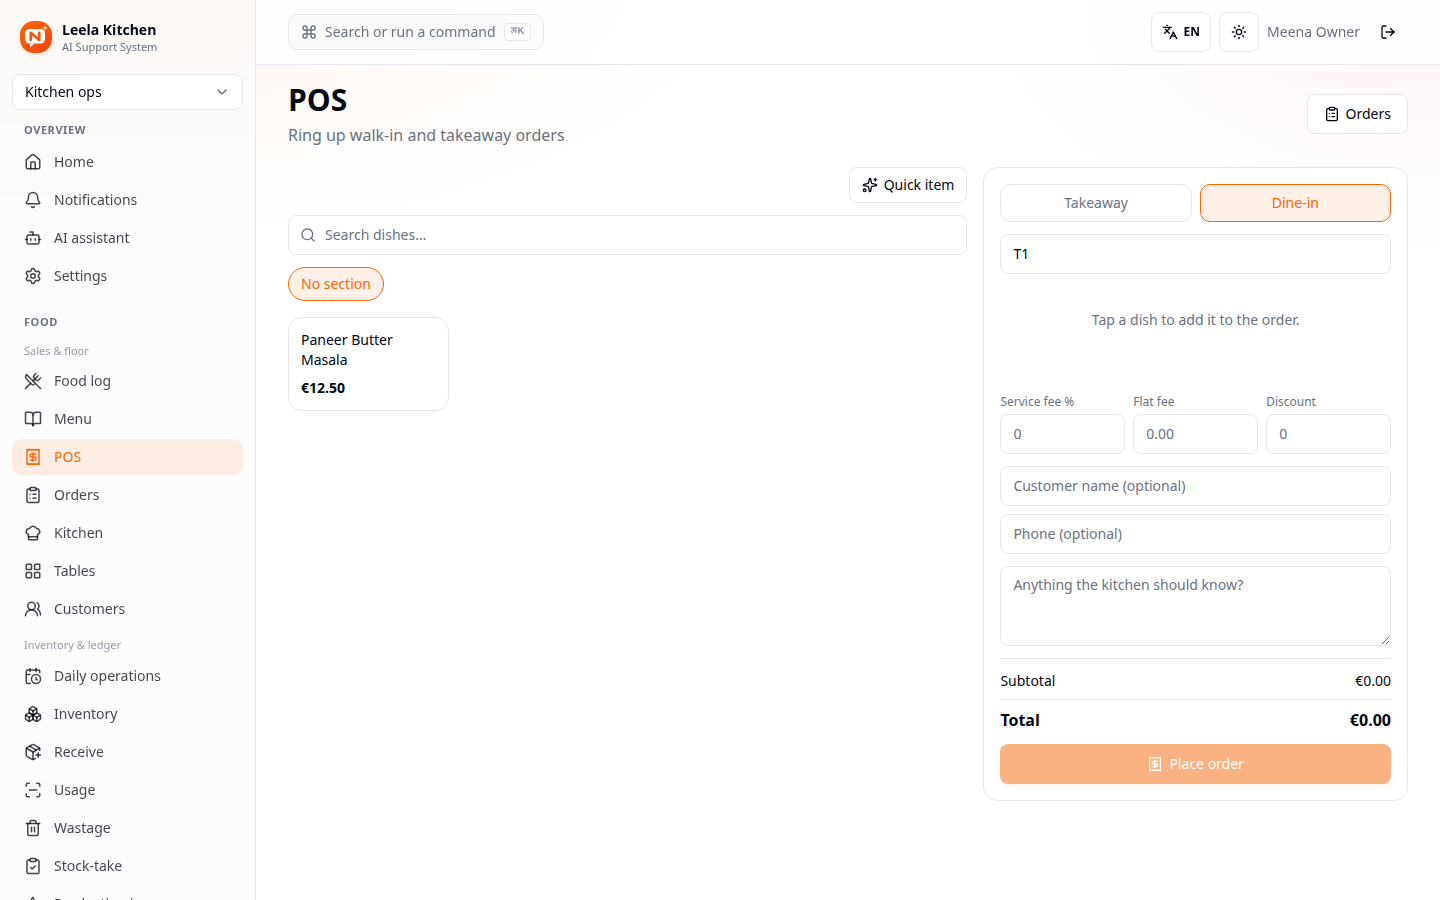
Tap a dish – Search or tap any Active dish to add it to the order. Quick item lets you ring up something that isn't on the menu at all.
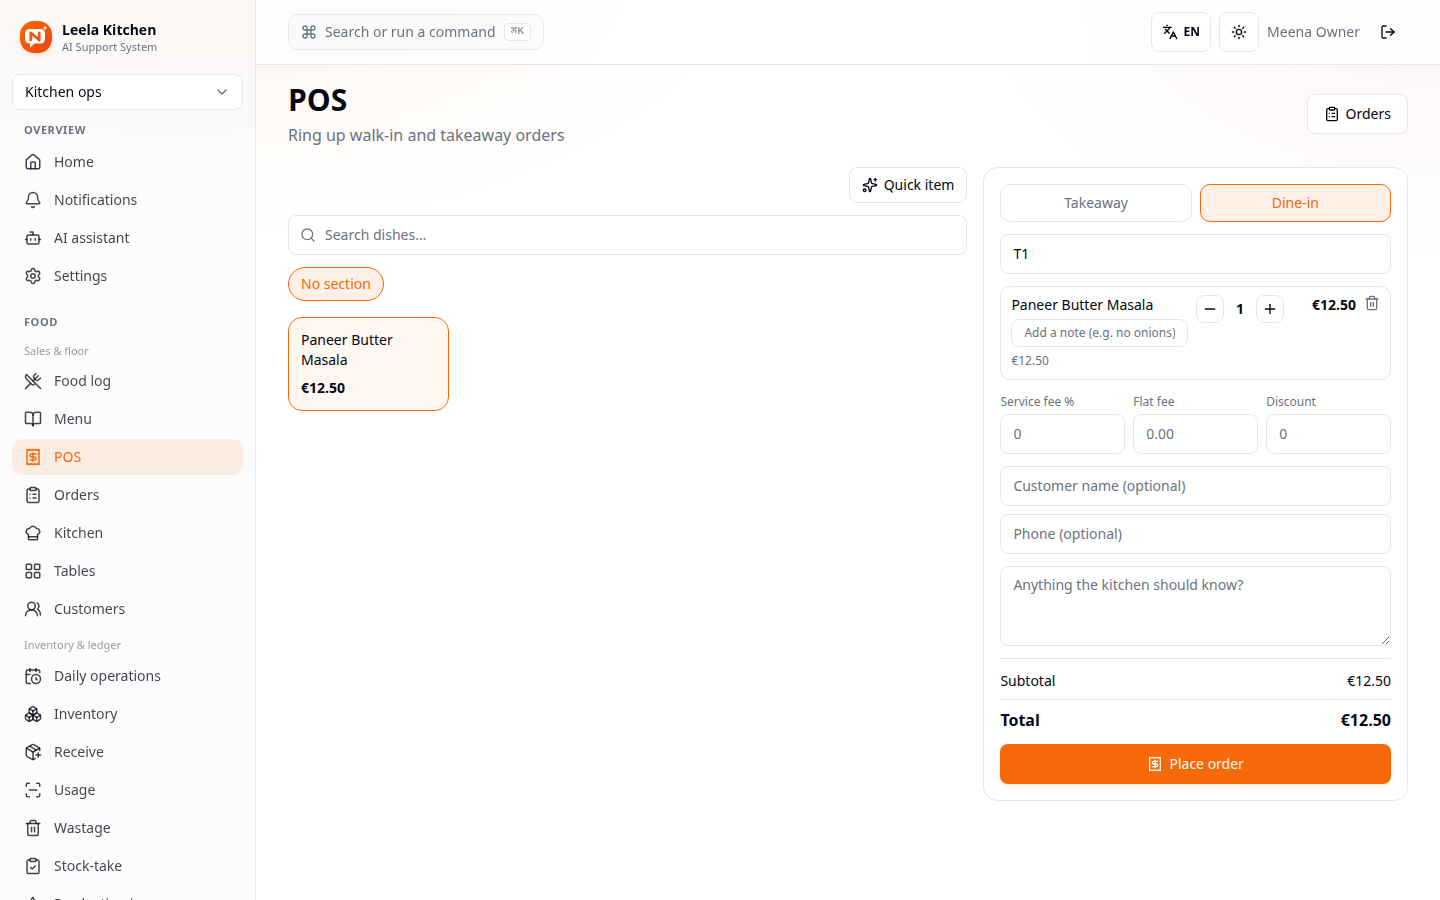
Click Place order to save it as a real order (unpaid, editable) - this alone does NOT tell the kitchen yet.
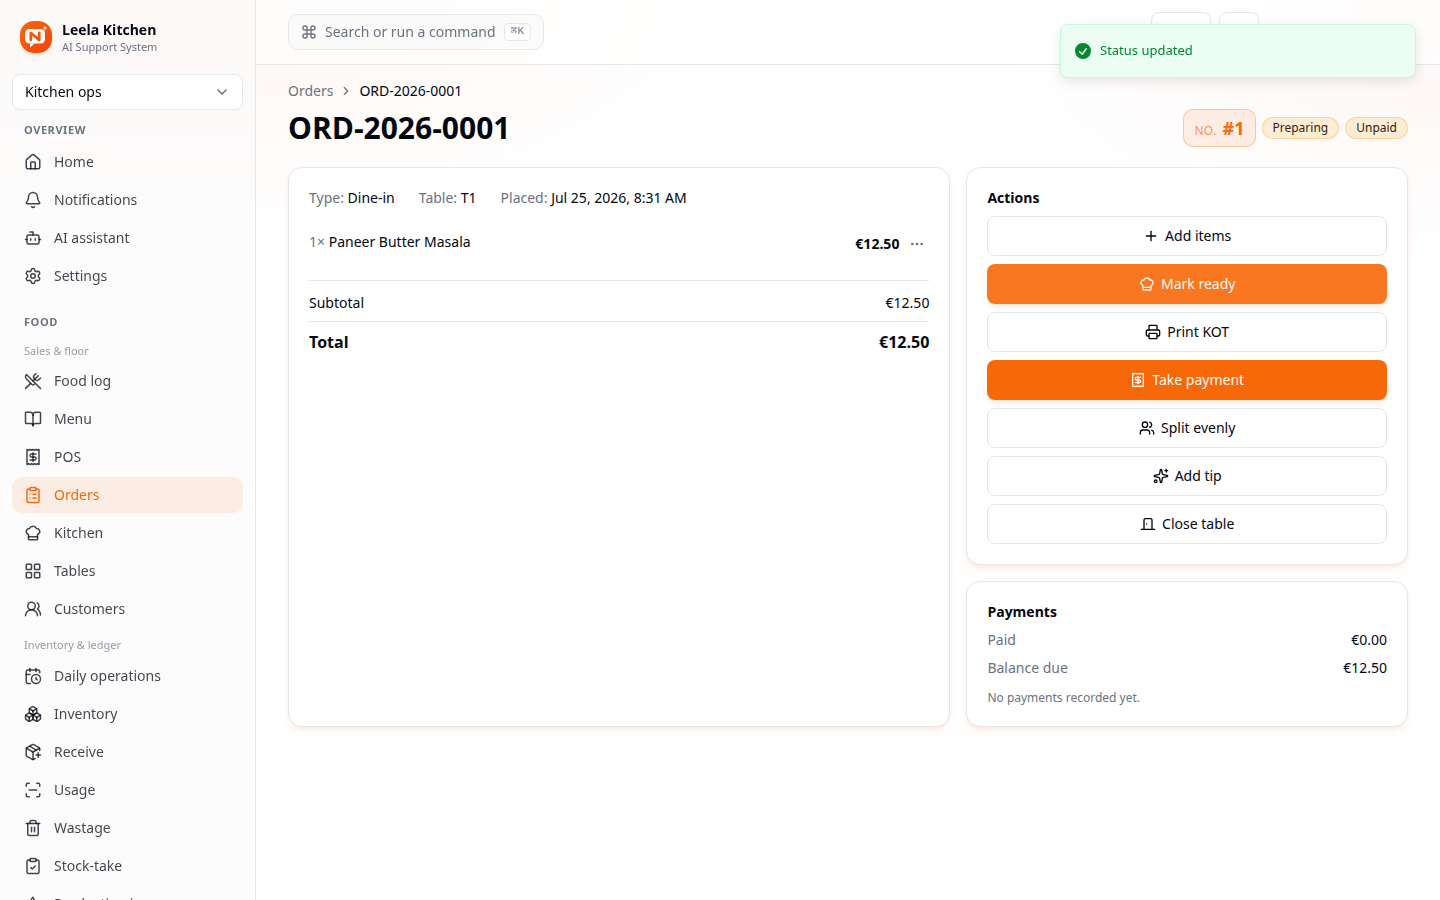
Send to kitchen is the separate action that actually fires it - this is the moment a ticket appears on the kitchen's own screen.
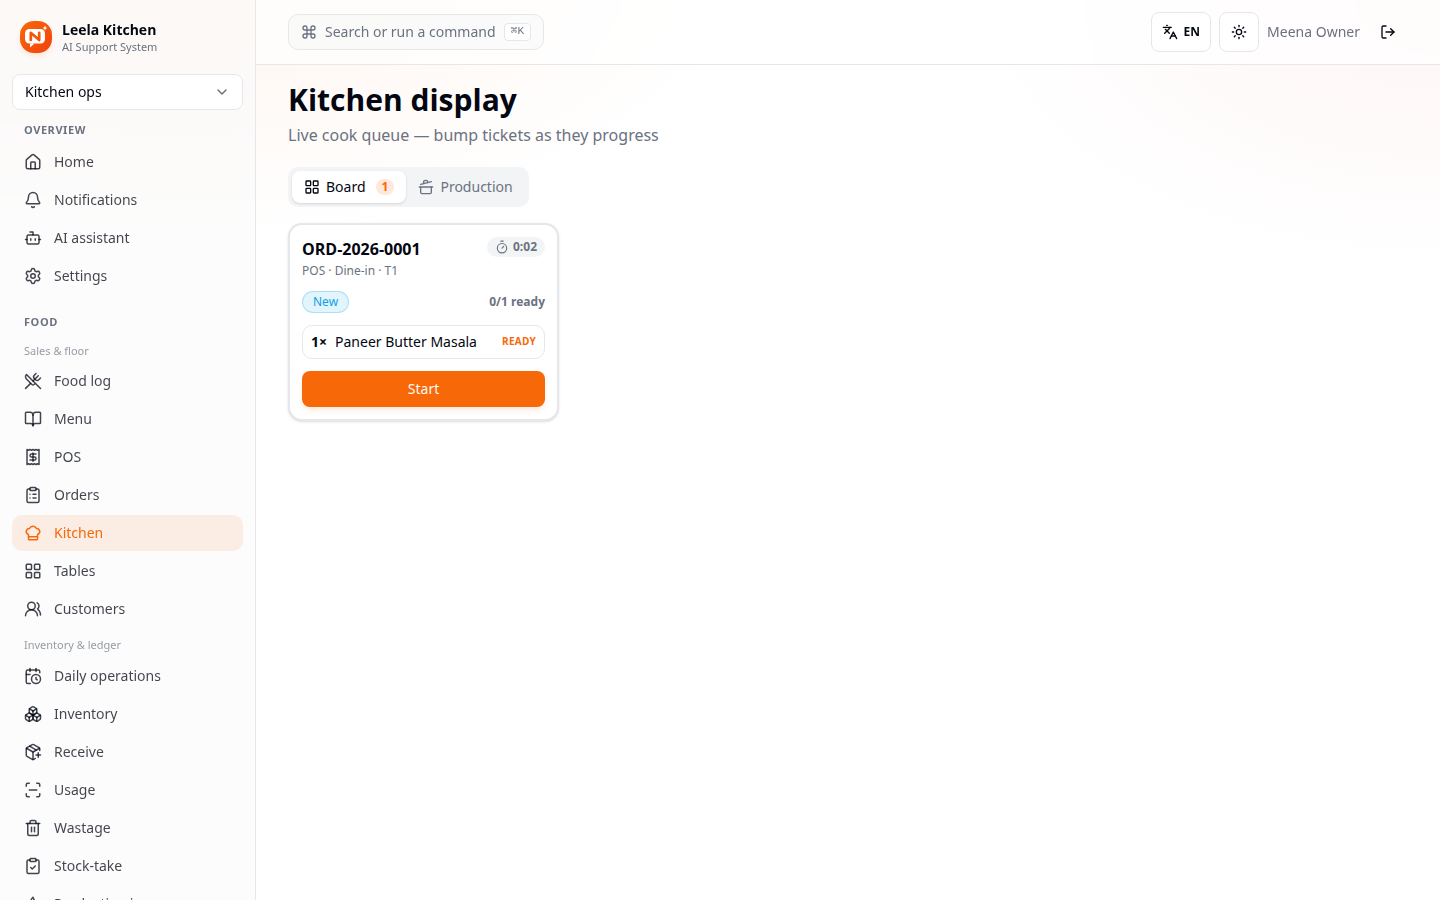
The Kitchen display (KDS) is the live cook queue - each ticket shows the order reference, channel (POS/Dine-in/table), how long it's been waiting, and every line with its own ready/not-ready state. The cook clicks Start, then bumps each line as it's cooked. When every line is ready, the ticket clears off the board.
Back on the order, Take payment tenders it through the exact same till flow covered in Manual: Retail till & billing.
Kitchens: custody zones for raw stock
A kitchen is where raw material physically lives once it leaves the main store - a QR-confirmed hand-off, not just a label. Before you can issue anything to a kitchen, the kitchen itself needs to exist.
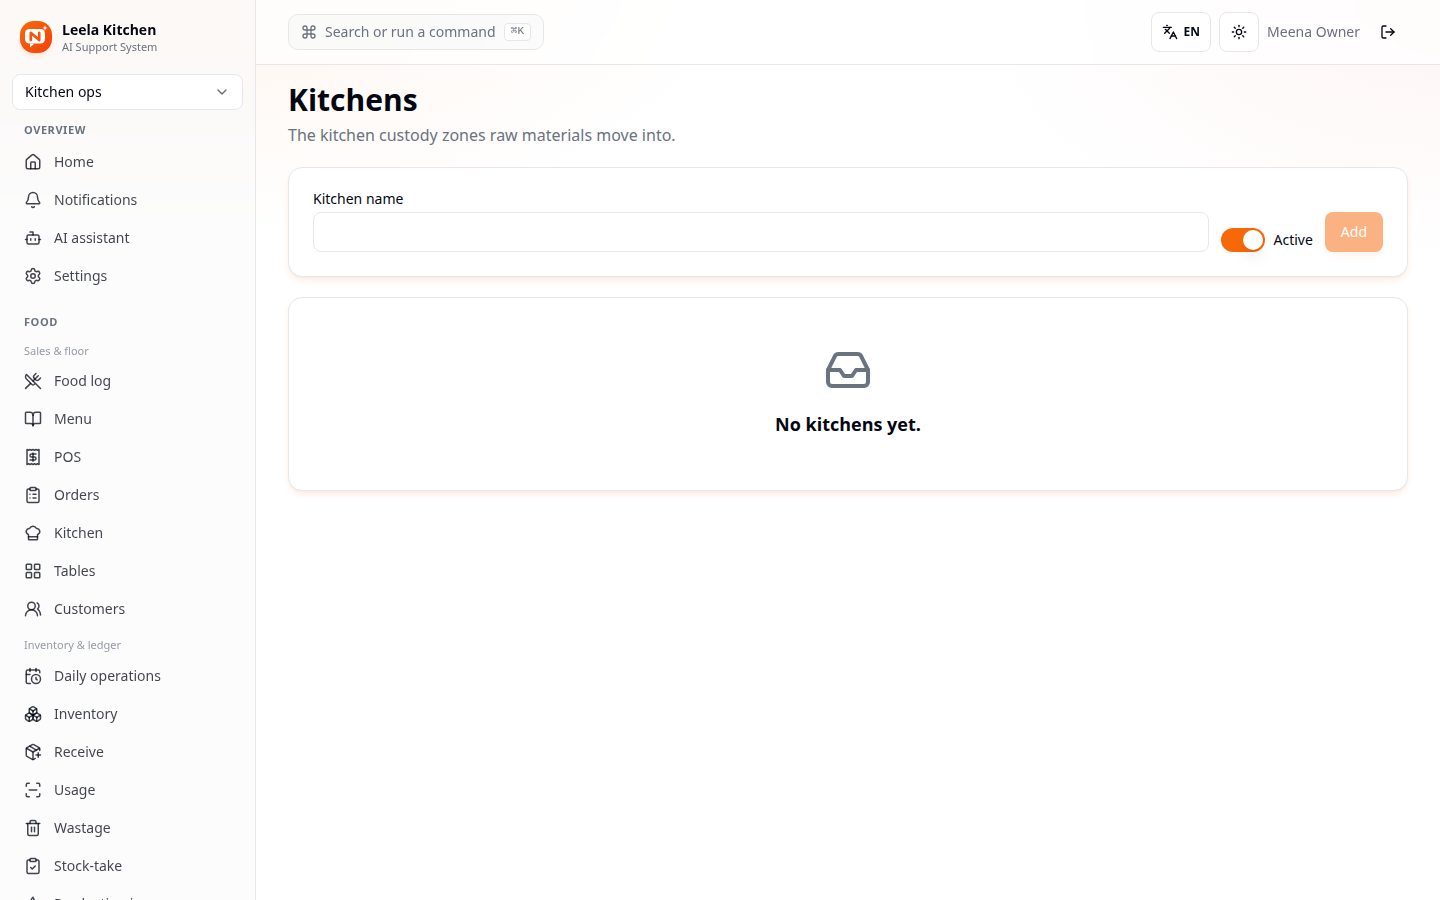
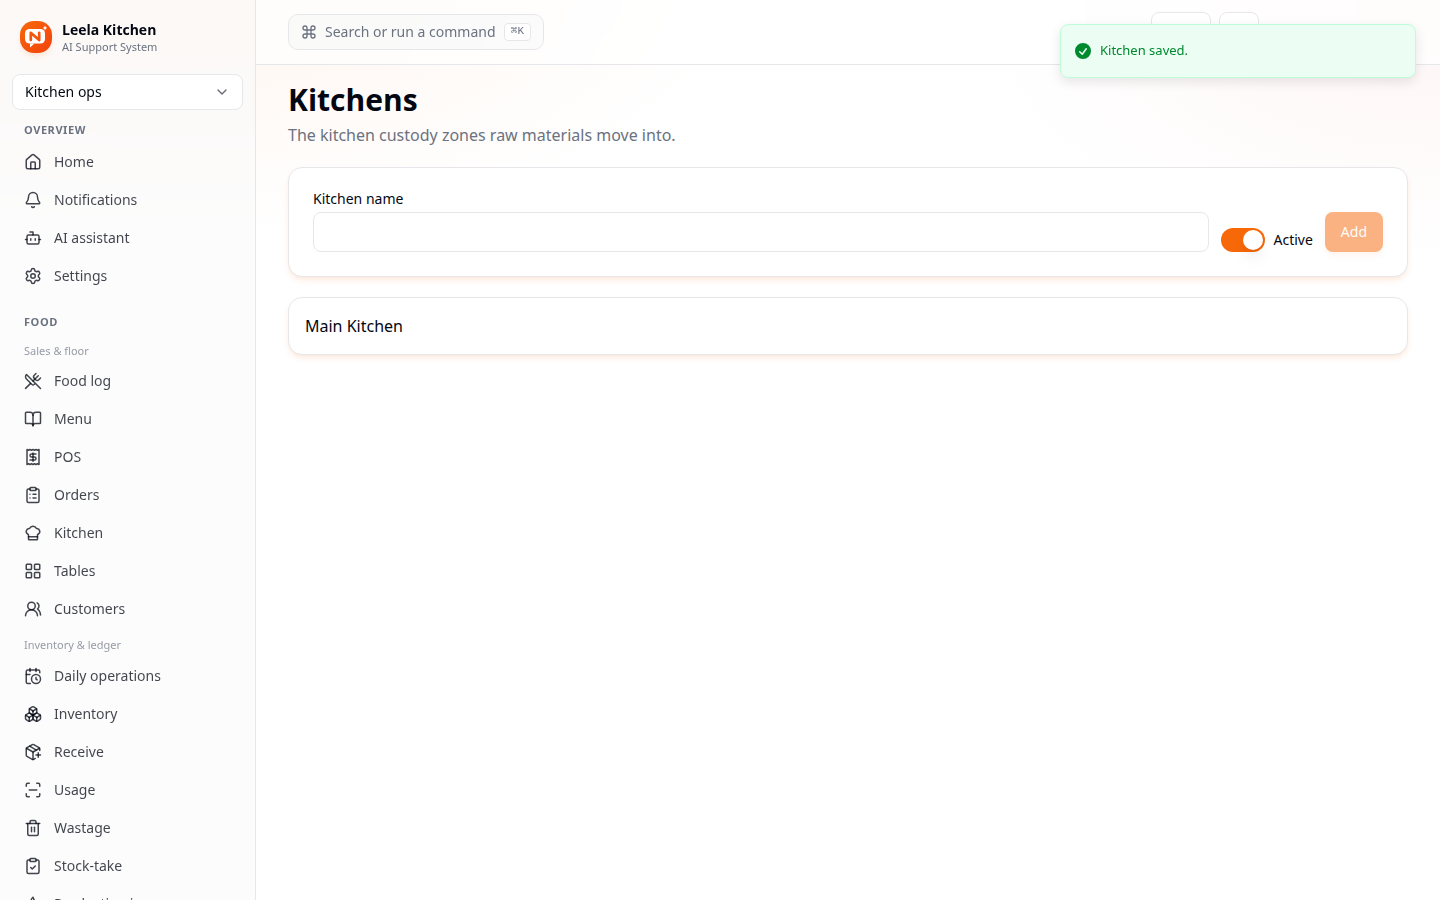
Type a name and click Add - there's no separate dialog, it's an inline list.
Handing stock to a kitchen
Go to Food → Kitchen custody → Kitchen issues, then New issue.
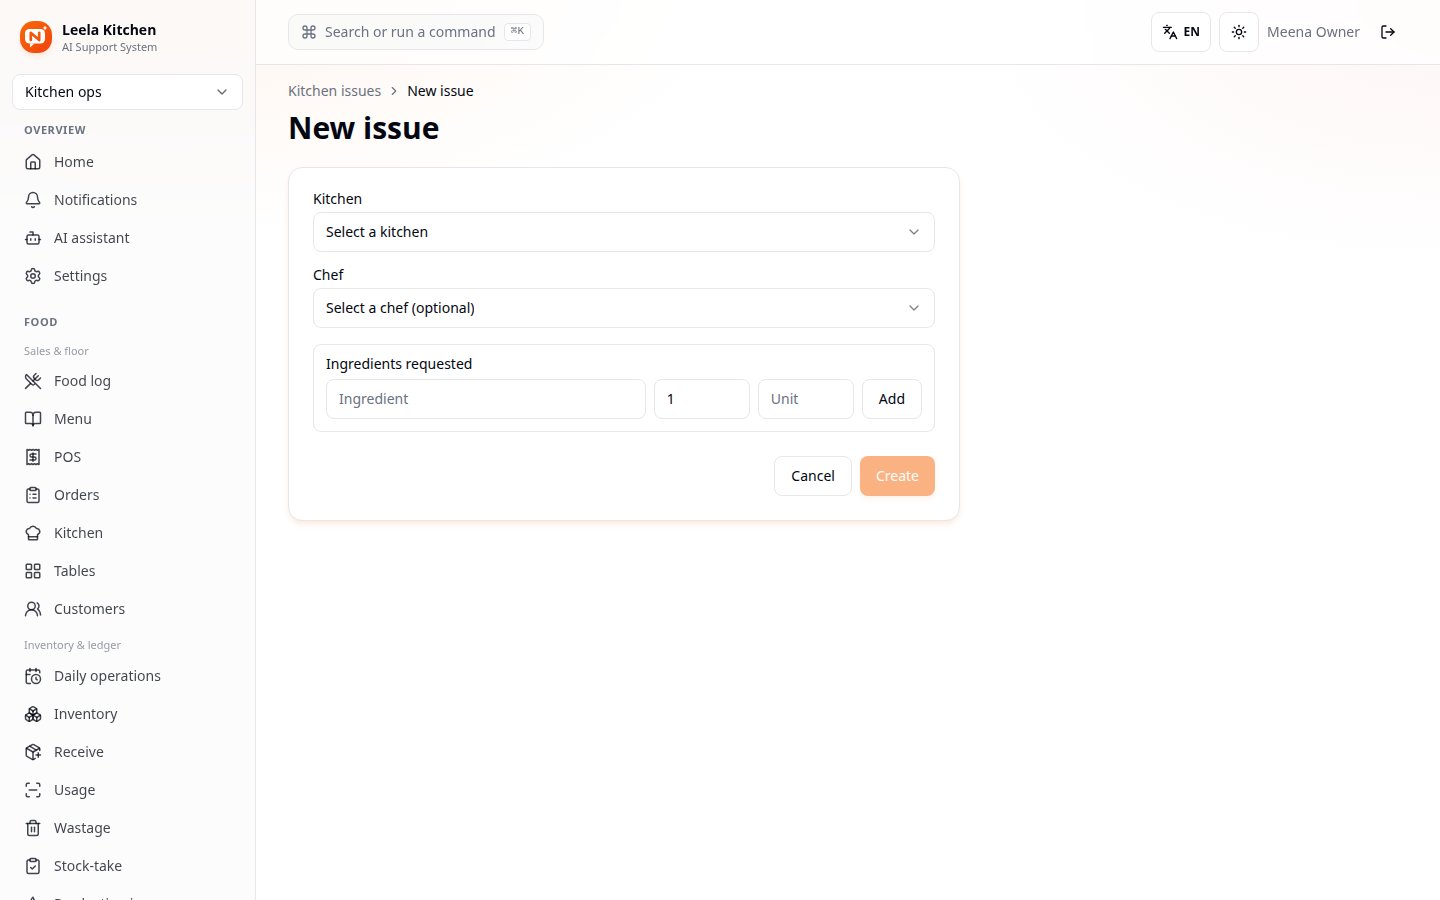
Pick the kitchen, an optional chef, and the ingredients you're sending over with their quantities.
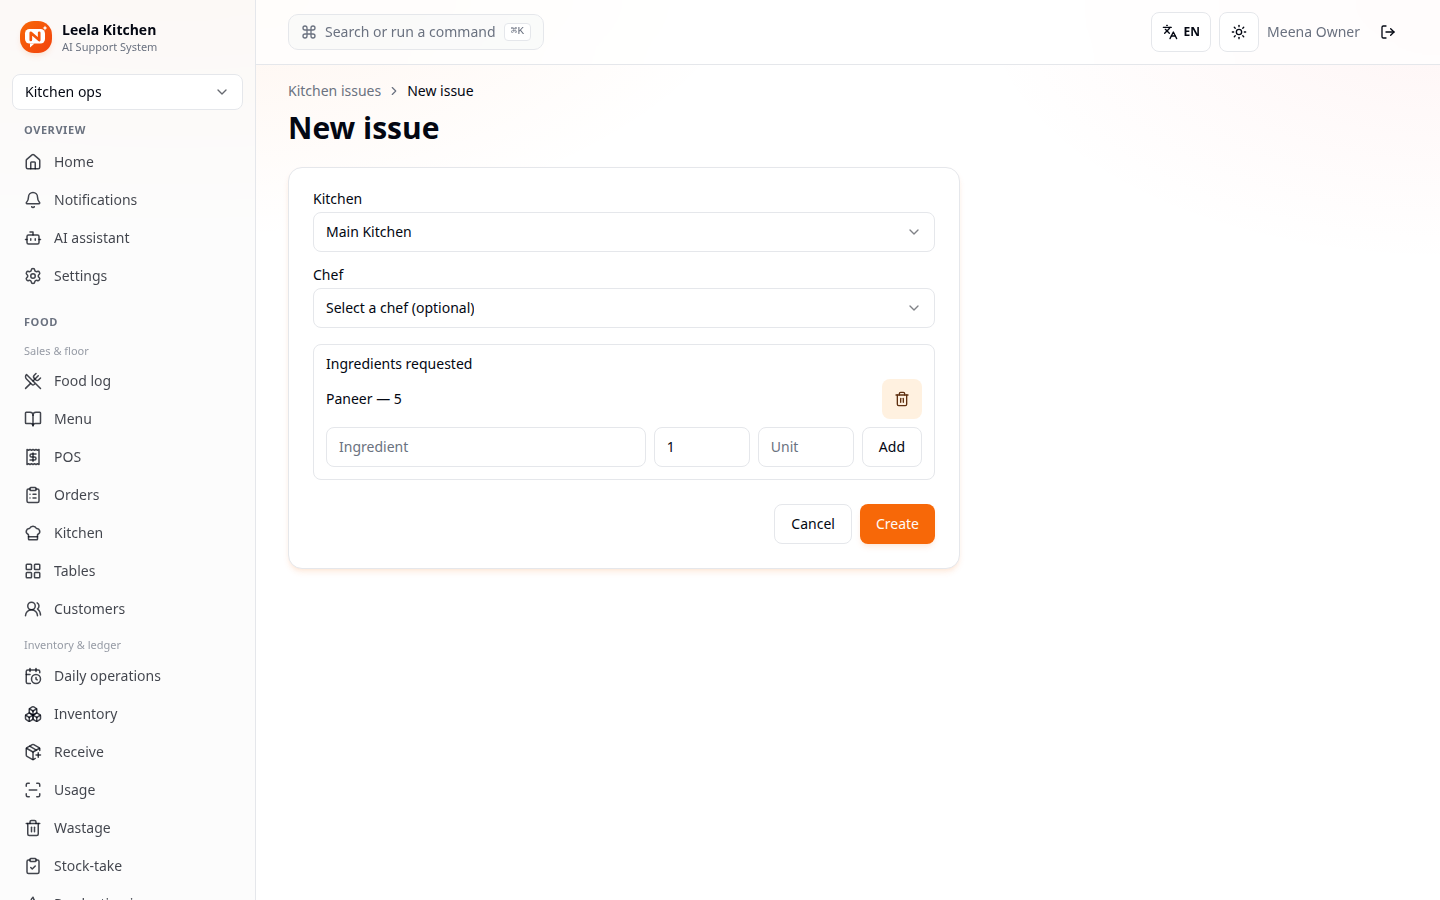
Create – Creating the issue does NOT move any stock yet - it's just a draft hand-off document with a QR code attached.
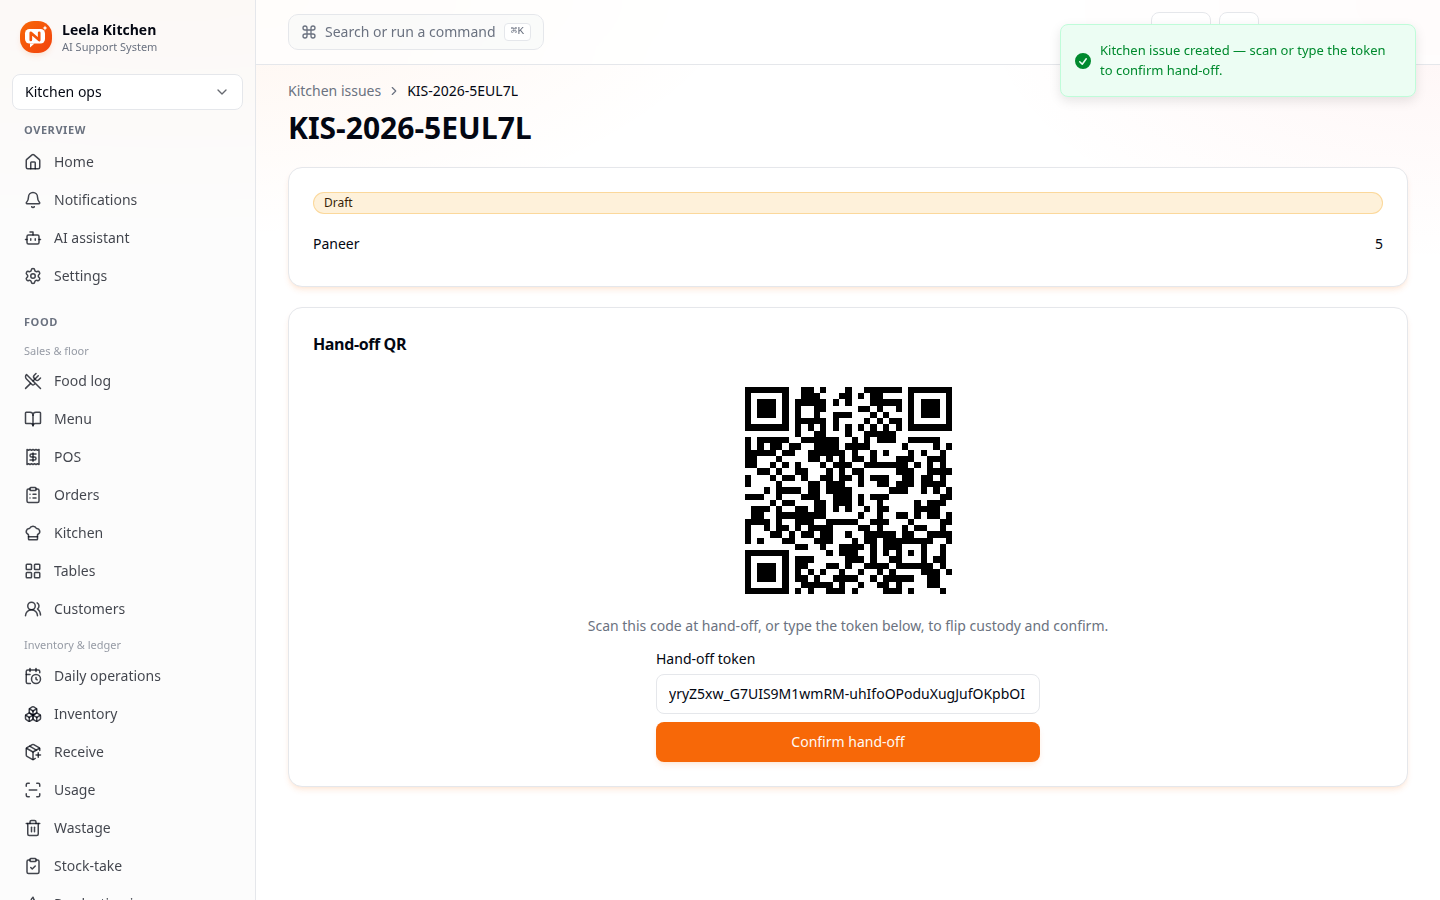
Custody only actually moves once someone at the kitchen scans this QR code (or types the token below it) and confirms. That's the real moment the stock leaves the main store's books and enters the kitchen's.
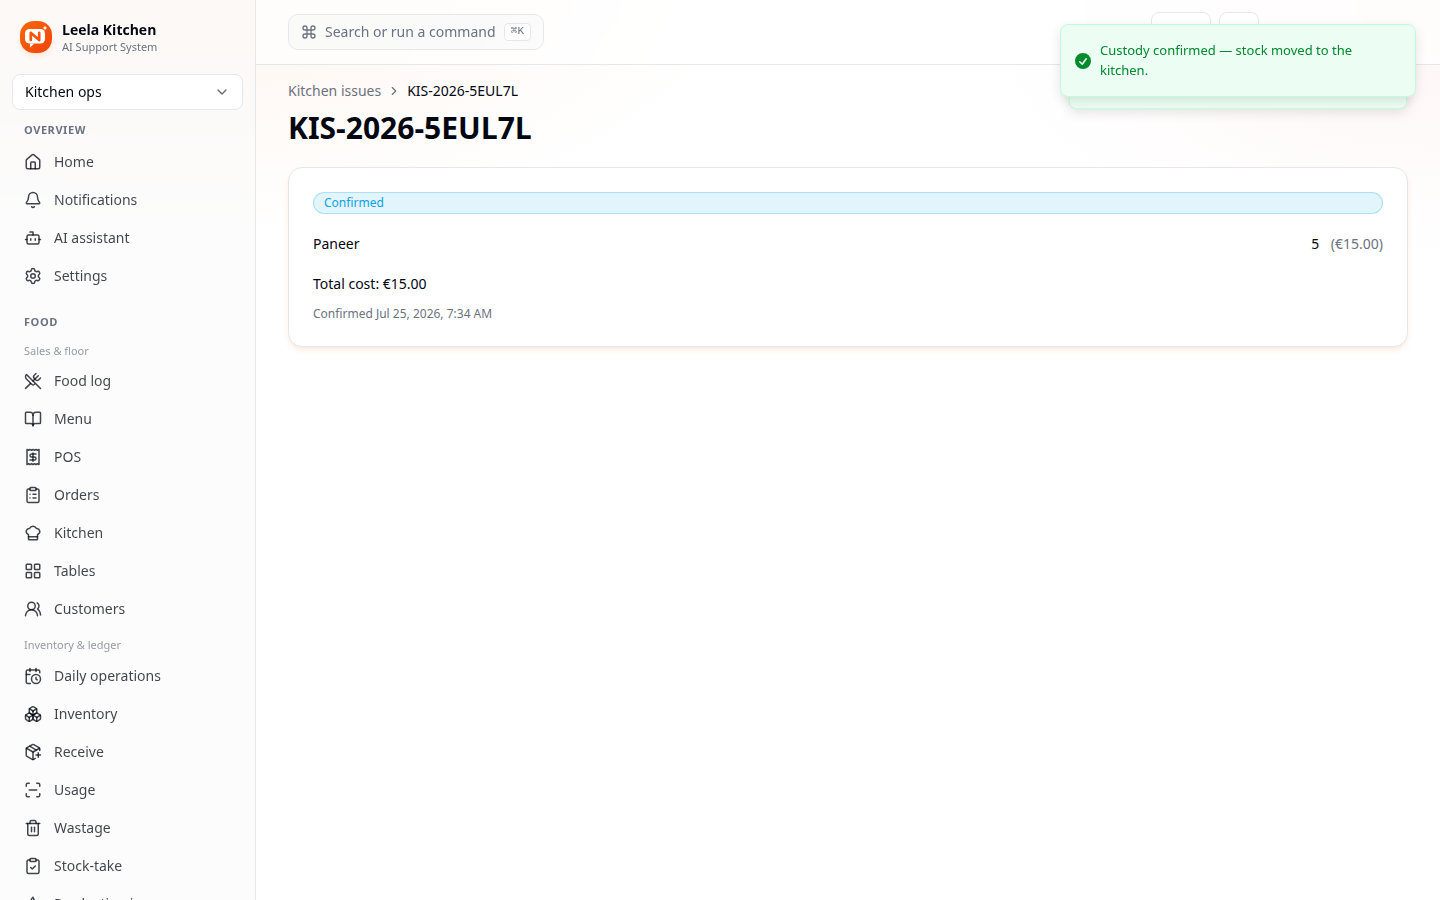
Once confirmed, the issue shows the real total cost of what moved - priced from your actual stock, the same cost figure the recipe's Food cost reads from.
There's a matching Kitchen requests flow for when the kitchen asks the store for stock first, and Kitchen counts for reconciling what a kitchen actually has on hand against what the books say it should have.
Production issue: turning raw material into a finished batch
A production issue is "we're about to cook N portions of this dish" - it scales the recipe to the quantity you need, and only actually deducts stock once you confirm the kitchen is really issuing it.
Go to Food → Kitchen custody → Production issues, then New issue.
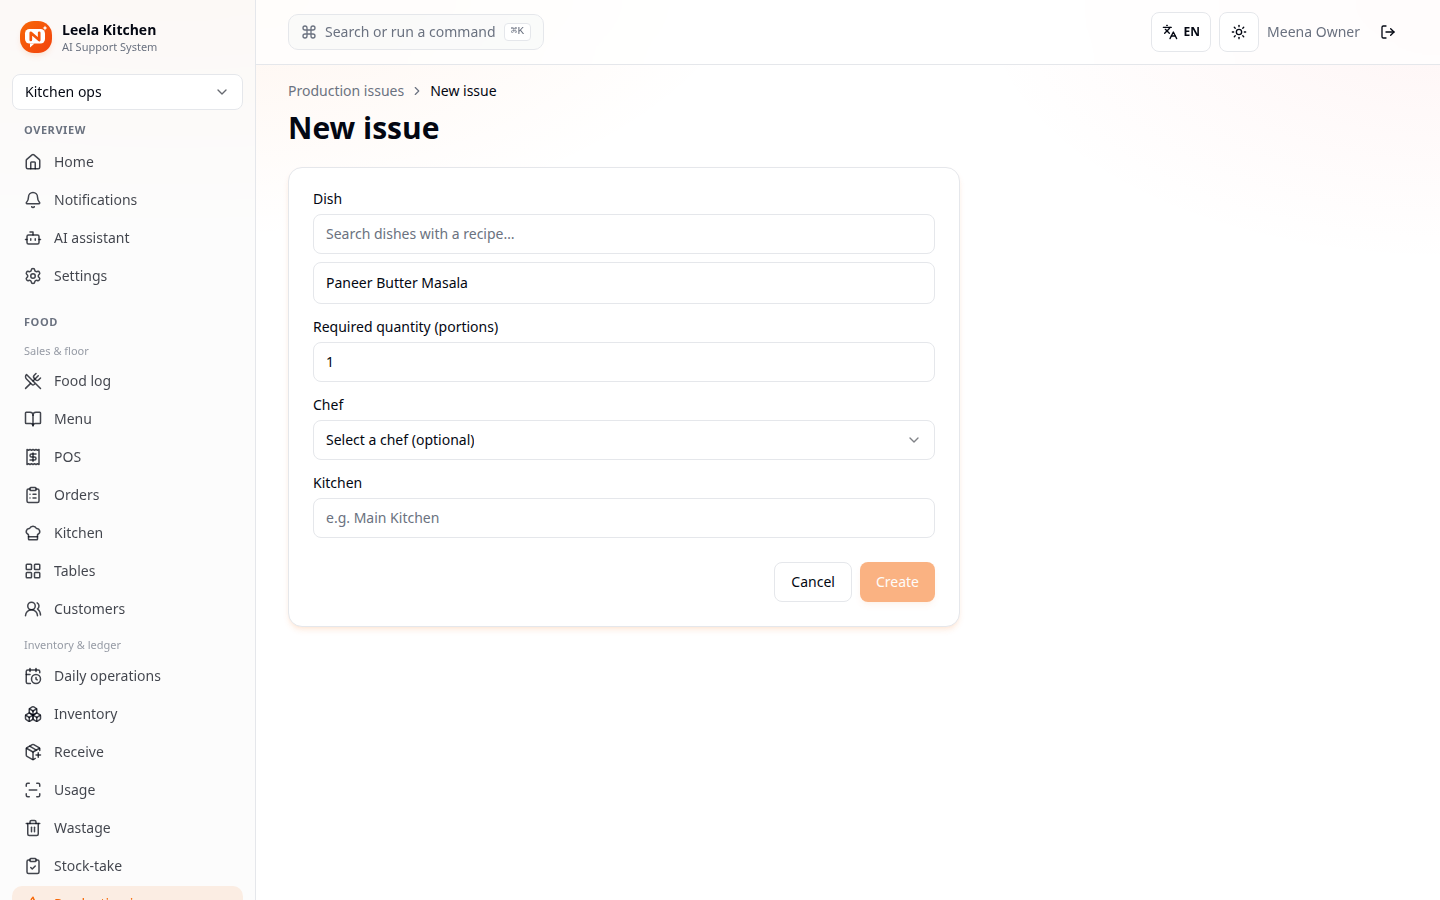
Search for a dish that already has a recipe, set the required quantity (in portions), and name the kitchen it's coming out of.
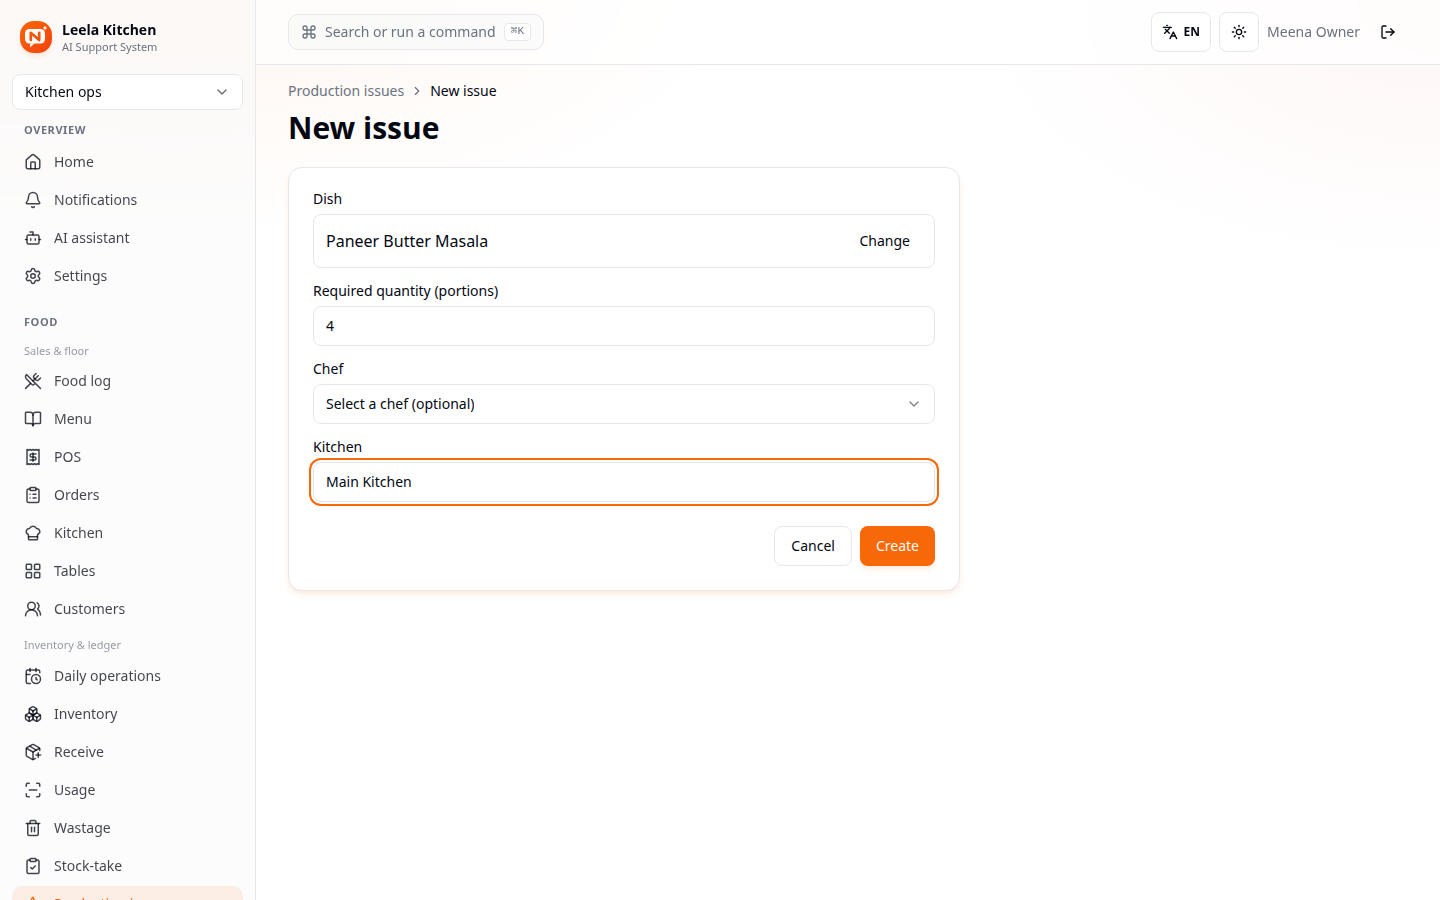
The Kitchen field here is free text, matched against the kitchens you've already created - type the exact name (e.g. "Main Kitchen") so the cost/stock movement lands against the right custody zone.
Click Create - this only saves a Draft, scaling every recipe line to the quantity you asked for. Nothing has moved yet.
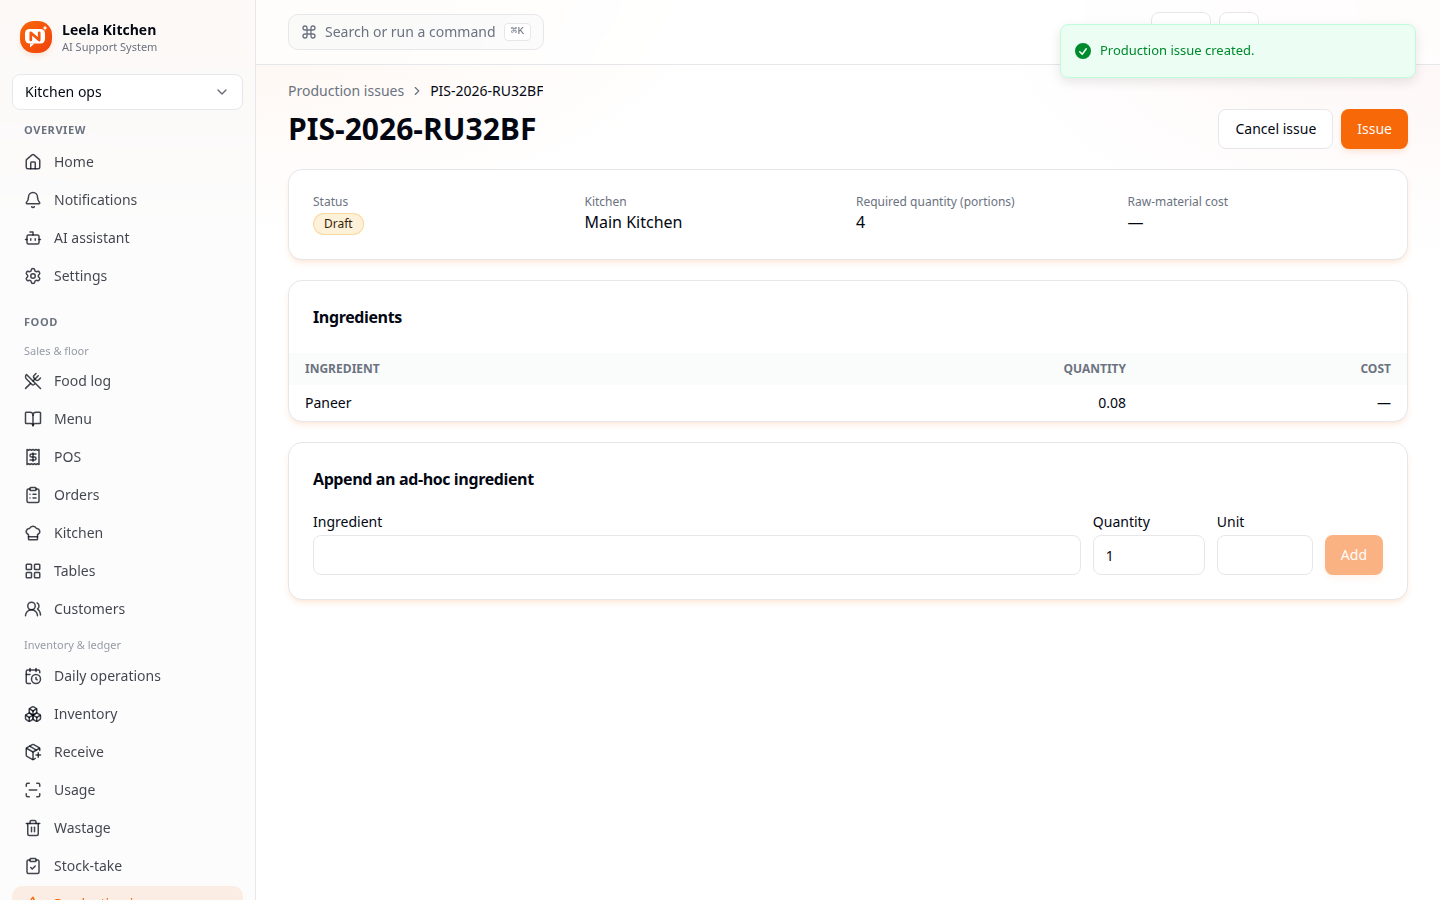
Click Issue to actually deduct the raw materials from stock.
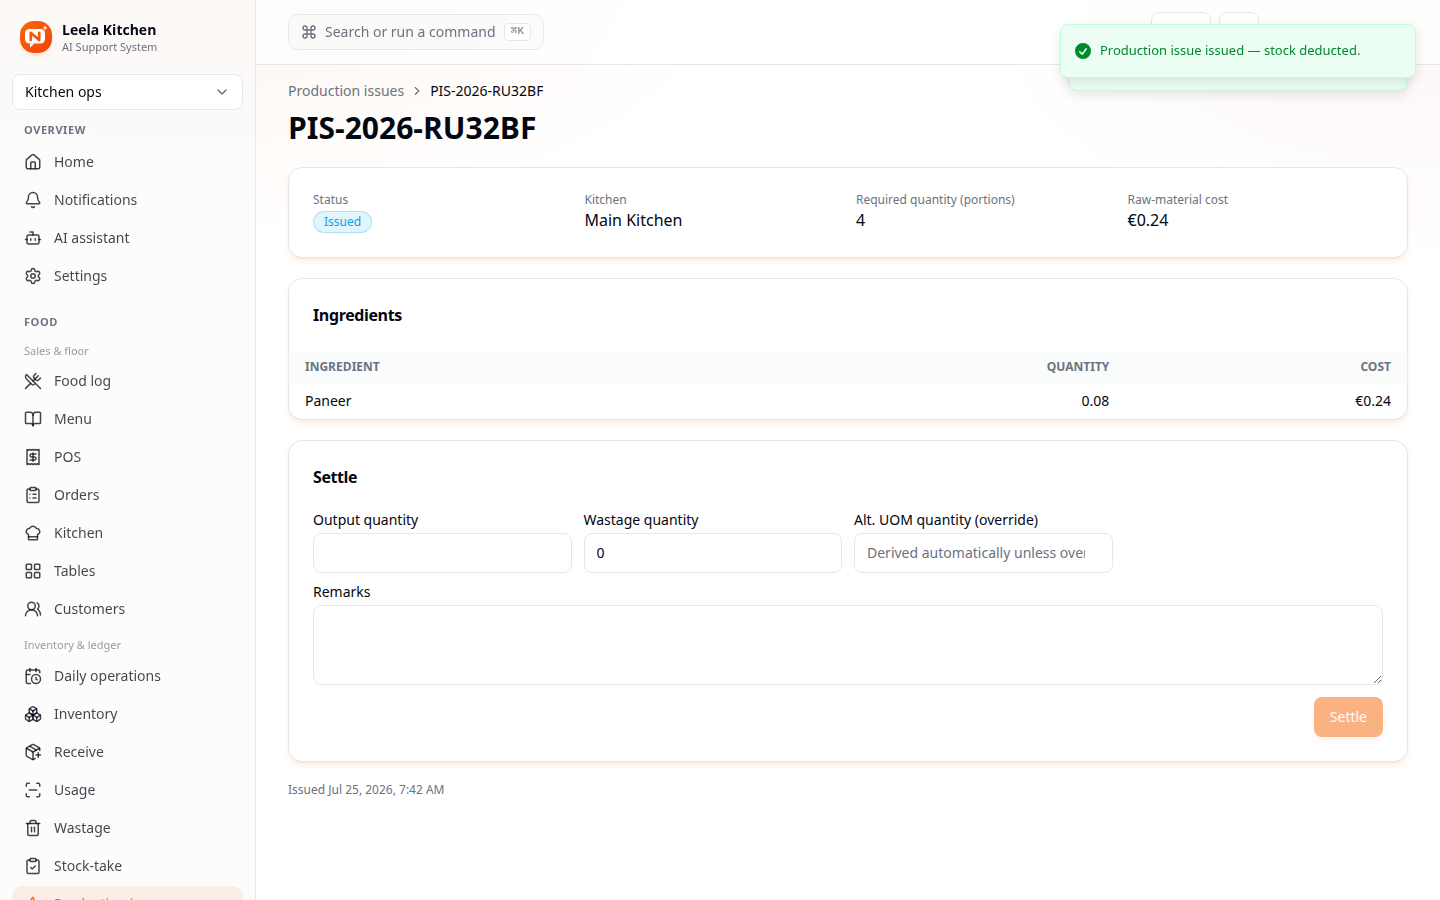
The issue now shows a real raw-material cost - what those ingredients actually cost, deducted from your stock the moment you clicked Issue.
Settling: recording what actually came out
Once the kitchen finishes cooking, come back and settle the issue with what really happened - output can (and often will) differ from what was planned, because cooking isn't exact.
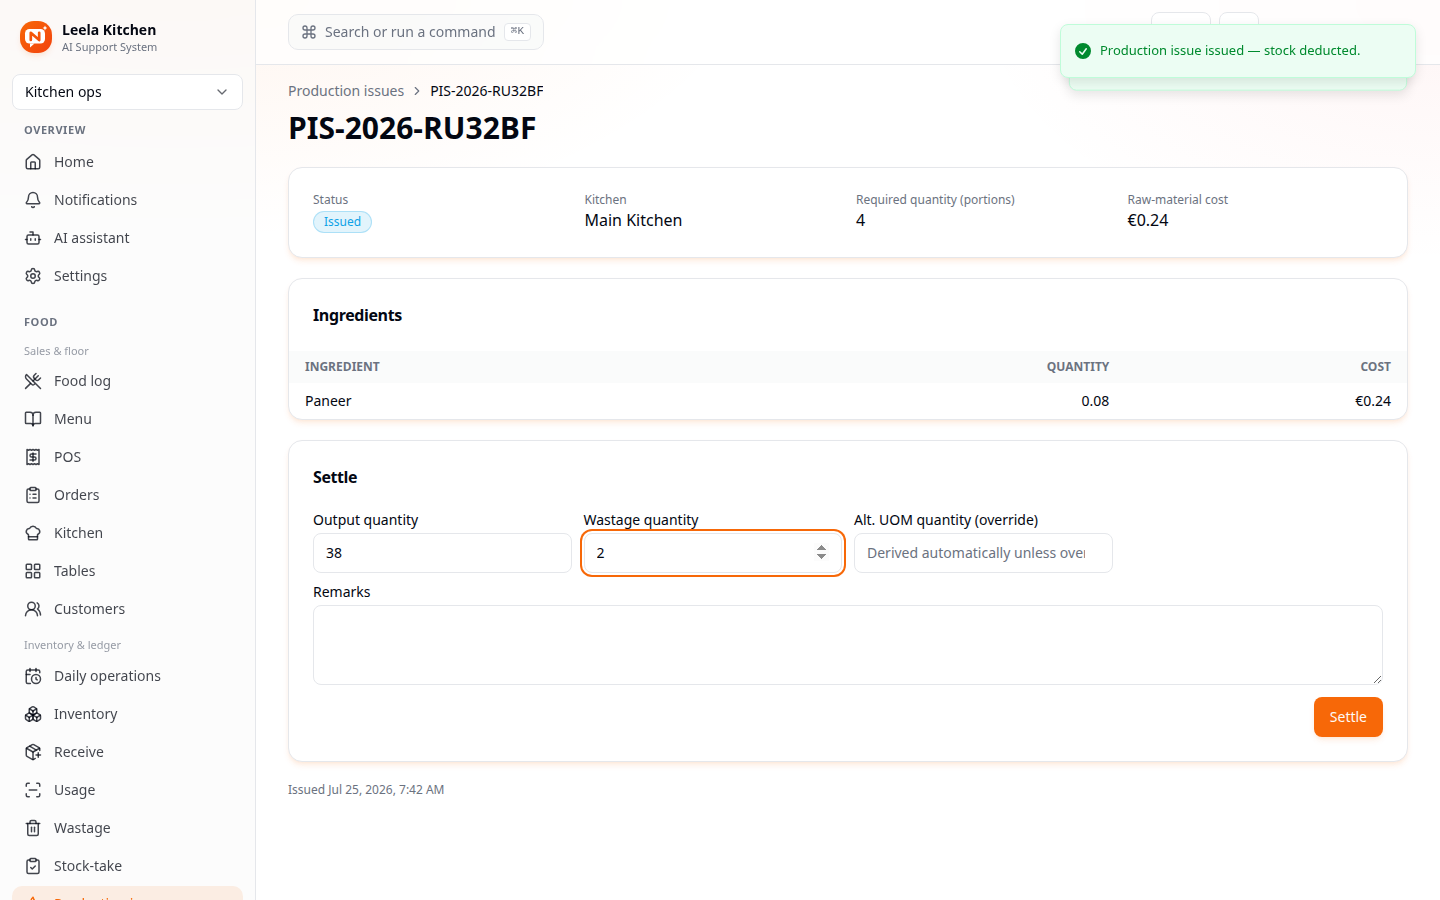
Enter the output quantity (how much you actually produced) and any wastage quantity (spoiled, dropped, over-trimmed). Click Settle.
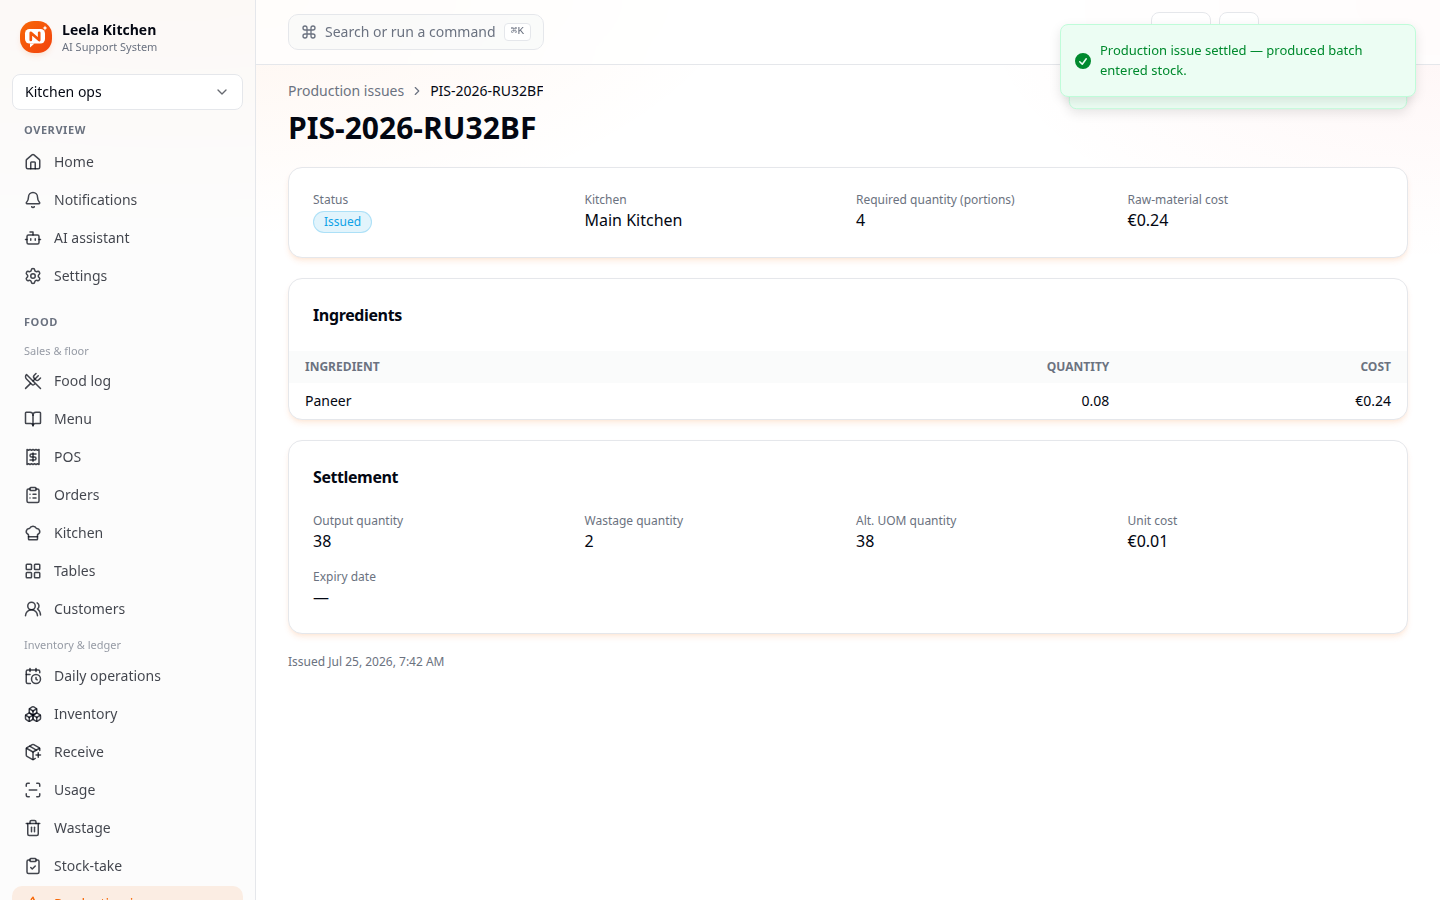
Settling does two things at once:
- Computes a real unit cost for the batch you just produced (the raw cost spread across however many units actually came out - not the planned quantity, the real one).
- Adds the produced batch to stock as a real item, ready to sell, costed at that unit cost.
Output + wastage must cover at least what you set out to issue - the app won't let you settle a batch as "less was made than was ever taken out of the store" without accounting for where the rest went.
The daily ledger
Everything above rolls up into one place: Daily operations, the actual record of a trading day for a Food workspace.
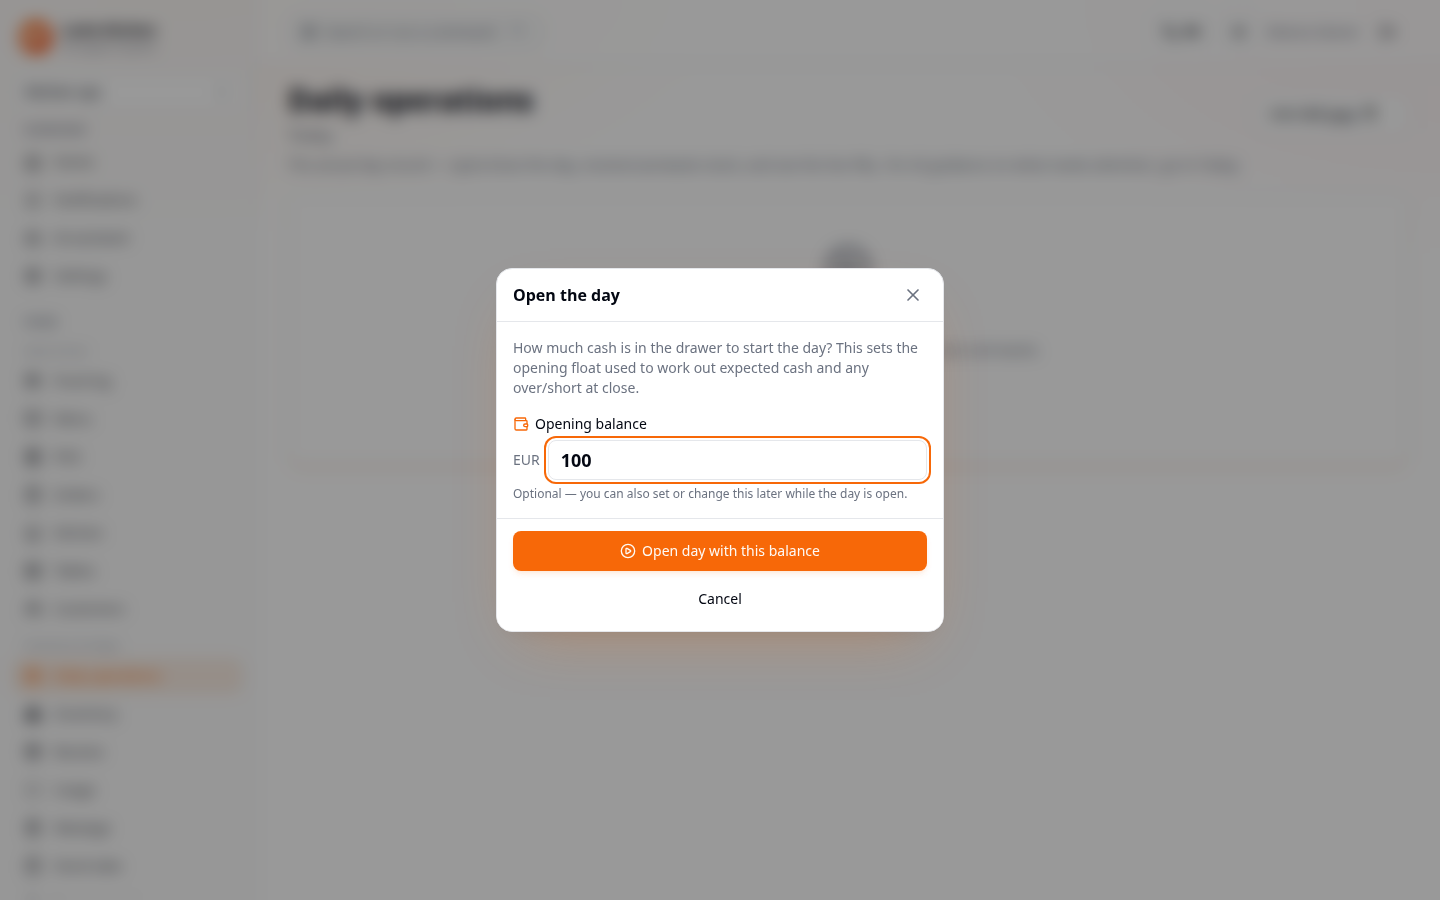
An owner, admin, or manager opens the day, optionally recording the cash float in the drawer to start.
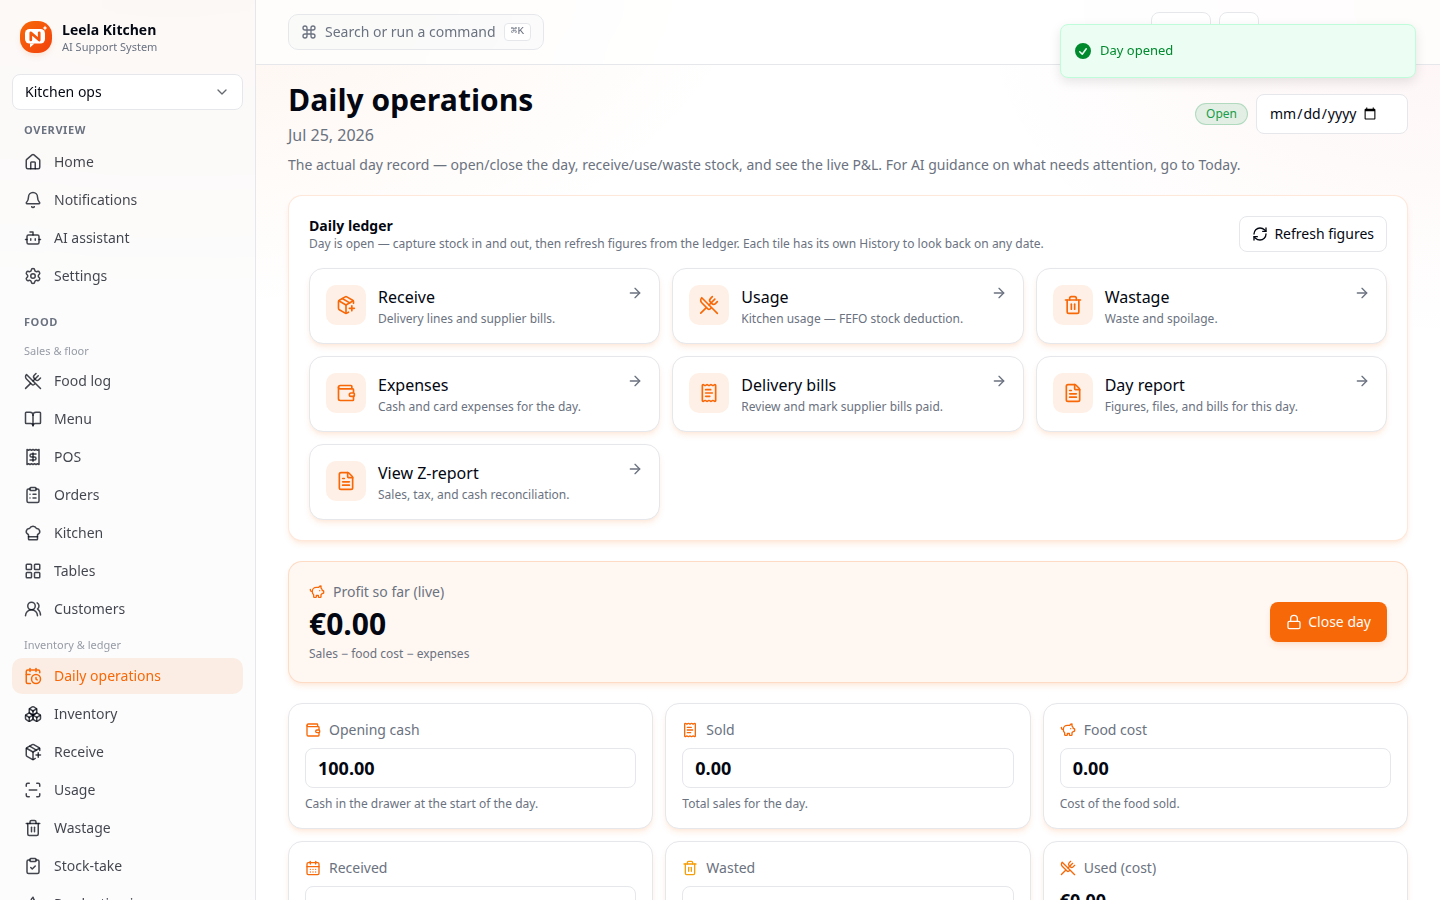
Once open, every tile is a shortcut into that day's own record - Receive (deliveries and supplier bills), Usage (kitchen consumption), Wastage, Expenses, Delivery bills, Day report, and View Z-report (sales/tax/cash reconciliation). The Profit so far (live) figure at the top updates as you go - sales minus food cost minus expenses, computed from everything recorded that day, not a number you type in.
At the end of trading, Close day locks the figures in for good.
Who can do what
| Action | Agent | Admin / Owner |
|---|---|---|
| View menu, recipes, kitchens, production issues | ✓ | ✓ |
| Change Food settings (tax, legal details) | ✗ | ✓ |
| Set up sections and tables | ✓ | ✓ |
| Create/edit a dish and its recipe | ✓ | ✓ |
| Take a dine-in order, send to kitchen, work the KDS | ✓ | ✓ |
| Create a kitchen issue and confirm hand-off | ✓ | ✓ |
| Create, issue, and settle a production issue | ✓ | ✓ |
| Add/edit kitchens (master list) | ✓ | ✓ |
| Open and close the trading day | ✗ | ✓ |
See also: Manual: Retail till & billing · Manual: Retail admin & back office
Manual: Retail admin & back office
Setting up products, suppliers, purchase orders, goods receipt, and the buying chain for a retail workspace.
Manual: AI Dining Co-Pilot
The table-QR guest experience - a branded digital menu with an AI concierge that curates group meals on a budget, answers dish questions in any language (typed or spoken), runs one shared cart per table, and pings the right server with one tap.